 ls
ls
Cybersecurity 2
This is a git repository which is hosted on GitHub; a beautiful place where we learn together cybersecurity and what faith will bring us. In this README I write my notes of the course but much of the content is, for brevity, a link to external resources. If you have any suggestion to improve this text or the course, please open an issue.
Table of Content
- Intro - NIS 2 and 27001
- Policies for information security
- Password Management
- Vulnerability Management
Intro
This course explores some of the real-world cybersecurity requests that an IT Manager (or an IT Office of a company) may receive. The requests are going to be driven by the NIS 2 Directive and one of the leading cybersecurity standards: ISO 27001.
NIS 2
The NIS2 Directive is the new European regulation designed to strengthen the cybersecurity of critical infrastructures, expanding the requirements of the previous NIS directive. In addition to requiring technical measures, NIS2 emphasizes the importance of a cultural shift, involving executives and employees in a shared approach to cybersecurity. The goal is to create a more aware and responsible security culture, integrating cybersecurity protection at every level of the organization.
In Italy, the implementation of the directive is managed by the National Cybersecurity Agency (ACN), which is responsible for supporting and overseeing the compliance of companies in essential sectors. The ACN provides guidelines, technical support, and, if necessary, sanctions for those who fail to comply with the regulations, with potential fiscal and criminal consequences.
What are the main requirements of NIS2?
- Risk Management and Security Measures: Organizations must implement security measures that match the risks they face, tailored to their structure and sector. This includes managing vulnerabilities, securing networks, and adopting data protection technologies.
- Incident Notification: Serious incidents must be reported to the National Cybersecurity Agency (ACN) within 24 hours of detection, followed by a detailed report within 72 hours, outlining the impact and actions taken.
- Business Continuity and Resilience Plans: Organizations must develop and maintain business continuity and resilience plans to ensure operations can be restored in the event of a cyber incident.
- Management’s Role and Responsibilities: NIS2 assigns specific responsibilities to company leadership, requiring top management to be actively involved in security compliance and in shaping cybersecurity strategies.
- Supply Chain Assessment: Companies must assess the security of their supply chain, including conducting risk analyses of suppliers and ensuring appropriate security measures are in place.
- Ongoing Training and Awareness: The directive requires continuous cybersecurity training for employees to build a company-wide culture focused on protecting against threats.
- Vulnerability Management: Subjects shall take into account the specific vulnerabilities of each direct supplier and service provider, as well as the overall quality of the products and cybersecurity practices of their suppliers and service providers, including their secure development procedures.
- Secure Development: Security of the acquisition, development, and maintenance of IT and network systems, including the management and disclosure of vulnerabilities.
- HR Security: Security of human resources, access control strategies, and asset management. Use of multi-factor authentication or continuous authentication solutions, secure voice, video, and text communications, and protected emergency communication systems by the entity internally, where applicable.
- Cyptography: implementation robust cryptographic controls to protect network and information systems from cyber threats. This includes the use of strong encryption algorithms, secure key management practices, and compliance with state-of-the-art cryptographic standards to ensure data confidentiality, integrity, and authenticity.
- Strong Authentication:
Of all the requests of the NIS 2 we will focus on Vulnerability Management and Password Managment which addresses the last two requests of the above list. Before moving on to the implementation and strategy, let’s have a look at the ISO 27001… no one wants to “reinvent the wheel”.
ISO 27001
The ISO 27001 is a cybersecurity standard. What is a standard? A document, a PDF, that defines a number of requirements and processes to make a business cyber-secure. We don’t want to dig into the details of the standard as it is not the IT Manager who defines the cybersecurity strategy but someone like the CISO (Chief Information Security Officer). However, a general understanding of the ISO 27001 is beneficial for those who deal with the IT Cybersecurity of a company. So, what does the ISO 27001 requires?
First, it asks the CISO to have a detailed understanding of the organization and the context where it operates along with the needs and expectations in terms of cybersecurity. There needs to be a commitment by the leadership of the organization and, to prioritize the investments in cybersecurity, a cybersecurity risk assessment is required. Once all of this is settled there’s a rather long set of controls that need to be defined and implemented. In the following part of the course, we go through some of those controls.
So, the CISO tells us, the IT Manager, that:
- The budget for cybersecurity is quite limited, we must to spend as little as possible.
- The company is a small enterprise with around 30 employees.
- There are a few offices and teams: the HR (Human Resources), Finance, and Development office/teams.
Policies for information security
From the ISO 27001:2022 “Information security policy and topic-specific policies shall be defined, approved by management, published, communicated to and acknowledge by relevant personnel and relevant interested parties, and reviewed at planned intervals and if significant changes occur.”
In other words, we want to define what the organization understands with the term cybersecurity and which policies we want to have in our organization to support the cybersecurity strategy. We can then list now, as part of the information security policy, the general cybersecurity properties we want to keep in mind (as IT Managers) when installing/implementing any new system.
- Confidentiality: preserving authorized restrictions on information access and disclosure, including means for protecting sensitive information (e.g., personal privacy and proprietary).
- Authorization: the definition of access rights and privileges to information of one or more agents.
- Secrecy: confidentiality is always guaranteed by applying cryptography to conceal the meaning of the information which, in turn, means guaranteeing the secrecy of information.
- Integrity: guarding against improper information modification or destruction. Integrity may further be specialized as:
- Authenticity: the process of verifying the identity of an agent (system, software, person, …).
- Identification: the act of providing the identity of an agent. The usual means to provide one’s identity are by the following factors: something the one knows (e.g., a password), have (e.g., a key), or is (e.g., fingerprint).
- Accountability or Non-Repudiation: a property that ensures that the actions of an entity may be traced uniquely to that entity.
- Availability: Ensuring timely and reliable access to and use of information
We now list the topic-specific policies (and procedures) we are going to address in this course.
- Password Policy and Password Management Procedure
- Access Control Policy and Access Control Management Procedure
- ~Threat Intelligence Policy~ (TBD)
- Management of technical vulnerabilities
- ~Information backup~ (TBD)
- Logging
- Network security
- Information classification
- Clock Sync
Password Policy
The password policy is the requirements that the CISO gives to us, the IT Manager. We first need to have those requirements to search for the right product.
- Password Storage (Confidentiality At-Rest)
- Passwords must be stored securely using strong encryption and never stored in plain text.
- Company Staff
- Must store passwords using a password management software configured to enforce the requirements contained in this policy.
- Must never store Passphrases.
- Secure Share (Confidentiality In-Transit)
- Passphrases must never be shared.
- Passwords must be shared using shared password vaults. Otherwise:
- Generating a link from which the recipient can obtain the password such that:
- The link is not available after 1 day.
- The link is not available after 1 click.
- Over an authenticated and encrypted channel offered by a trusted password management software.
- Generating a link from which the recipient can obtain the password such that:
- Complexity
- Passwords:
- Must be at least 16 characters long.
- Must contain a combination of uppercase letters, lowercase letters, numbers, and special characters.
- Passphrases must be at least 4 words long separated by one special character.
- Passwords:
- Strength
- Passwords:
- Must be generated randomly.
- Must not contain easily guessable information, such as personal names, common words.
- Passphrases:
- Must not contain personal information (such as name, surname, date of birth etc).
- Must not contain information related to the user (such as friend’s names, dog’s name, usual or latest vacation place etc).
- Passwords:
- Uniqueness
- Any password and passphrase must be different from any other business or personal password and passphrase.
- Rotation
- Passwords must be changed at least every 6 months.
- Passphrases must be changed at least every year.
- Passwords and passphrases must not be intentionally reused (i.e., passwords and passphrases cannot be changed into a password or passphrase previously used, unless this happens due to the randomness of the choice of passwords).
- Multi-Factor Authentication (MFA)
- MFA must be implemented for all accounts.
- MFA options must include one or more of the following factors: one-time passwords, biometrics, hardware tokens.
- Password Recovery
- There must be a process for the:
- Recovery of the passphrase used for the password management tool
- Recovery of the passwords used for the business products and services
- There must be a process for the:
The most interesting requirement is the “secure share”. While the requirement is rather high-level, it creates a major difficulty as we have several teams which may regularly want to share some credentials. For example, our dev team may need to share credentials of service accounts. It is unlikely that the employees will regularly generate 1 day, 1 click, links of documents containing credentials (e.g., of service accounts) and share those over secure channels. So, we need a password manage which allows not just personal vaults for the employees but also shared vaults (for credentials shared among teams).
With this in mind, we can review some password management products on the market against the requirements defined so far.
Password Manager
As our main requirement is to spend as little as possible, we search for open-source and freeware solutions and we find:
PSono is the only one which meets all the requirements. The “secure share” requirement is especially difficult to implement with the other products. KeePass does not come with a system to manage shared password vaults and different teams. Of course there is some IT magic we could do to implement an access control but PSono offers that support out of the box. Bitwarden, PassBolt, and ProtonPass offer shared vaults but not for free (or with a very limited number of users, below the number of the employees of our company).
TeamPass, as PSono, meets all the requirements but we choose PSono as it provides a richer number of UX features as the autotype of passwords (impossible? in TeamPass).
PSono Install
First we need a plan!
- Setup a Linux server where we host PSono
- Install and configure PSono
- Model the architecture and secure it!
As this is an example, instead of buying/using a real (cloud) server, we install Debian 12 (without windows system/environment and with sshd) on a Virtual Box (Virtual Machine - VM). Remember to set the network adapted to “bridged mode”. The requirements for the VM are available in the Installation Preparation Section of the official PSono Documentation. The documentation wants 3 VMs for the main architectural components of PSono (database, application server, file server). However, as this is just an exercise, we will install everything on one single VM.
Once we can ssh into our VM, we add our user (named x) to the sudoers.
# apt install sudo
# /usr/sbin/adduser x sudo
Then we log-out and back in.
We can also install a few “utilities” on our server, such as vim, tree and screen.
Install Postgres
The first step in the PSono installation is to install the Posgres DBMS and to configure the PSono database. But to do that, we need docker.
Docker
Following the official Docker documentation on how to install Docker Engine on Debian, we run:
for pkg in docker.io docker-doc docker-compose podman-docker containerd runc; do sudo apt-get remove $pkg; done

# Add Docker's official GPG key:
sudo apt-get update
sudo apt-get install ca-certificates curl gnupg
sudo install -m 0755 -d /etc/apt/keyrings
curl -fsSL https://download.docker.com/linux/debian/gpg | sudo gpg --dearmor -o /etc/apt/keyrings/docker.gpg
sudo chmod a+r /etc/apt/keyrings/docker.gpg

# Add the repository to Apt sources:
echo \
  "deb [arch="$(dpkg --print-architecture)" signed-by=/etc/apt/keyrings/docker.gpg] https://download.docker.com/linux/debian \
  "$(. /etc/os-release && echo "$VERSION_CODENAME")" stable" | \
  sudo tee /etc/apt/sources.list.d/docker.list > /dev/null
sudo apt-get update

sudo apt-get install docker-ce docker-ce-cli containerd.io docker-buildx-plugin docker-compose-plugin
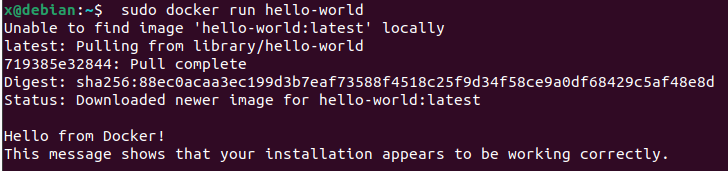
We then verify the installation was successful with sudo docker run hello-world.
We may also want to allow our user x to run docker without appending the sudo command.
We can achieve that by creating a group docker and adding the user x to it.
sudo groupadd docker
sudo usermod -aG docker $USER
# Log-out and then log-in
newgrp docker
We can now test if the user x can run docker with:
docker run hello-world

Going back to the PSono documentation for Postgres we run the following
commands remembering to change password with a strong password:
sudo mkdir -p /opt/docker/psono/postgres
sudo docker run --name psono-database \
 -v /opt/docker/psono/postgres:/var/lib/postgresql/data \
 -e POSTGRES_USER=psono \
 -e POSTGRES_PASSWORD=password \
 -d --restart=unless-stopped \
 -p 5432:5432 postgres:13-alpine
Install PSono Community Edition (CE)
The second step is to install the PSono CE. Create a file settings.yml as follows
sudo touch /opt/docker/psono/settings.yaml
and add the following configuration.
# generate the following six parameters with the following command
# docker run --rm -ti psono/psono-combo:latest python3 ./psono/manage.py generateserverkeys
SECRET_KEY: 'SOME SUPER SECRET KEY THAT SHOULD BE RANDOM AND 32 OR MORE DIGITS LONG'
ACTIVATION_LINK_SECRET: 'SOME SUPER SECRET ACTIVATION LINK SECRET THAT SHOULD BE RANDOM AND 32 OR MORE DIGITS LONG'
DB_SECRET: 'SOME SUPER SECRET DB SECRET THAT SHOULD BE RANDOM AND 32 OR MORE DIGITS LONG'
EMAIL_SECRET_SALT: '$2b$12$XUG.sKxC2jmkUvWQjg53.e'
PRIVATE_KEY: '02...0b'
PUBLIC_KEY: '02...0b'
# The URL of the web client (path to e.g activate.html without the trailing slash)
# WEB_CLIENT_URL: 'https://psono.example.com'
# Switch DEBUG to false if you go into production
DEBUG: False
# Adjust this according to Django Documentation https://docs.djangoproject.com/en/2.2/ref/settings/
ALLOWED_HOSTS: ['*']
# Should be your domain without "www.". Will be the last part of the username
ALLOWED_DOMAINS: ['example.com']
# If you want to disable registration, you can comment in the following line
# ALLOW_REGISTRATION: False
# If you want to disable the lost password functionality, you can comment in the following line
# ALLOW_LOST_PASSWORD: False
# If you want to enforce that the email address and username needs to match upon registration
# ENFORCE_MATCHING_USERNAME_AND_EMAIL: False
# If you want to restrict registration to some email addresses you can specify here a list of domains to filter
# REGISTRATION_EMAIL_FILTER: ['company1.com', 'company2.com']
# Should be the URL of the host under which the host is reachable
# If you open the url and append /info/ to it you should have a text similar to {"info":"{\"version\": \"....}
HOST_URL: 'https://psono.example.com/server'
# The email used to send emails, e.g. for activation
# ATTENTION: If executed in a docker container, then "localhost" will resolve to the docker container, so
# "localhost" will not work as host. Use the public IP or DNS record of the server.
EMAIL_FROM: 'the-mail-for-for-example-useraccount-activations@test.com'
EMAIL_HOST: 'smtp.example.com'
EMAIL_HOST_USER: ''
EMAIL_HOST_PASSWORD : ''
EMAIL_PORT: 25
EMAIL_SUBJECT_PREFIX: ''
EMAIL_USE_TLS: False
EMAIL_USE_SSL: False
EMAIL_SSL_CERTFILE:
EMAIL_SSL_KEYFILE:
EMAIL_TIMEOUT: 10
# In case one wants to use mailgun, comment in below lines and provide the mailgun access key and server name
# EMAIL_BACKEND: 'anymail.backends.mailgun.EmailBackend'
# MAILGUN_ACCESS_KEY: ''
# MAILGUN_SERVER_NAME: ''
# In case you want to offer Yubikey support, create a pair of credentials here https://upgrade.yubico.com/getapikey/
# and update the following two lines before commenting them in
# YUBIKEY_CLIENT_ID: '123456'
# YUBIKEY_SECRET_KEY: '8I65IA6ASDFIUHGIH5021FKJA='
# If you have your own Yubico servers, you can specify here the urls as a list
# YUBICO_API_URLS: ['https://api.yubico.com/wsapi/2.0/verify']
# Cache enabled without belows Redis may lead to unexpected behaviour
# Cache with Redis
# By default you should use something different than database 0 or 1, e.g. 13 (default max is 16, can be configured in
# redis.conf) possible URLS are:
# redis://[:password]@localhost:6379/0
# rediss://[:password]@localhost:6379/0
# unix://[:password]@/path/to/socket.sock?db=0
# CACHE_ENABLE: False
# CACHE_REDIS: False
# CACHE_REDIS_LOCATION: 'redis://127.0.0.1:6379/13'
# Enables the management API, required for the psono-admin-client / admin portal (Default is set to False)
MANAGEMENT_ENABLED: True
# Enables the fileserver API, required for the psono-fileserver
# FILESERVER_HANDLER_ENABLED: False
# Enables files for the client
# FILES_ENABLED: False
# Allows that users can search for partial usernames
# ALLOW_USER_SEARCH_BY_USERNAME_PARTIAL: True
# Allows that users can search for email addresses too
# ALLOW_USER_SEARCH_BY_EMAIL: True
# Disables central security reports
# DISABLE_CENTRAL_SECURITY_REPORTS: True
# Configures a system wide DUO connection for all clients
# DUO_INTEGRATION_KEY: ''
# DUO_SECRET_KEY: ''
# DUO_API_HOSTNAME: ''
# If you are using the DUO proxy, you can configure here the necessary HTTP proxy
# DUO_PROXY_HOST: 'the-ip-or-dns-name-goes-here'
# DUO_PROXY_PORT: 80
# DUO_PROXY_TYPE: 'CONNECT'
# If your proxy requires specific headers you can also configure these here
# DUO_PROXY_HEADERS: ''
# Normally only one of the configured second factors needs to be solved. Setting this to True forces the client to solve all
# MULTIFACTOR_ENABLED: True
# Allows admins to limit the offered second factors in the client
# ALLOWED_SECOND_FACTORS: ['yubikey_otp', 'google_authenticator', 'duo', 'webauthn']
# Your Postgres Database credentials
# ATTENTION: If executed in a docker container, then "localhost" will resolve to the docker container, so
# "localhost" will not work as host. Use the public IP or DNS record of the server.
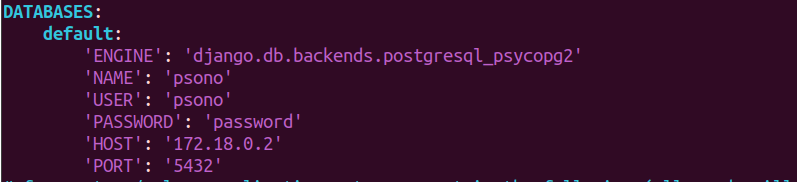
DATABASES:
default:
'ENGINE': 'django.db.backends.postgresql_psycopg2'
'NAME': 'psono'
'USER': 'psono'
'PASSWORD': 'password'
'HOST': 'localhost'
'PORT': '5432'
# for master / slave replication setup comment in the following (all reads will be redirected to the slave
# slave:
# 'ENGINE': 'django.db.backends.postgresql_psycopg2'
# 'NAME': 'YourPostgresDatabase'
# 'USER': 'YourPostgresUser'
# 'PASSWORD': 'YourPostgresPassword'
# 'HOST': 'YourPostgresHost'
# 'PORT': 'YourPostgresPort'
# The path to the template folder can be "shadowed" if required later
TEMPLATES: [
{
'BACKEND': 'django.template.backends.django.DjangoTemplates',
'DIRS': ['/root/psono/templates'],
'APP_DIRS': True,
'OPTIONS': {
'context_processors': [
'django.template.context_processors.debug',
'django.template.context_processors.request',
'django.contrib.auth.context_processors.auth',
'django.contrib.messages.context_processors.messages',
],
},
},
]
Now we can generate the first six parameter of the settings file running the following command.
docker run --rm -ti psono/psono-combo:latest python3 ./psono/manage.py generateserverkeys
and update the config file in /opt/docker/psono/settings.yaml.
Email Configuration
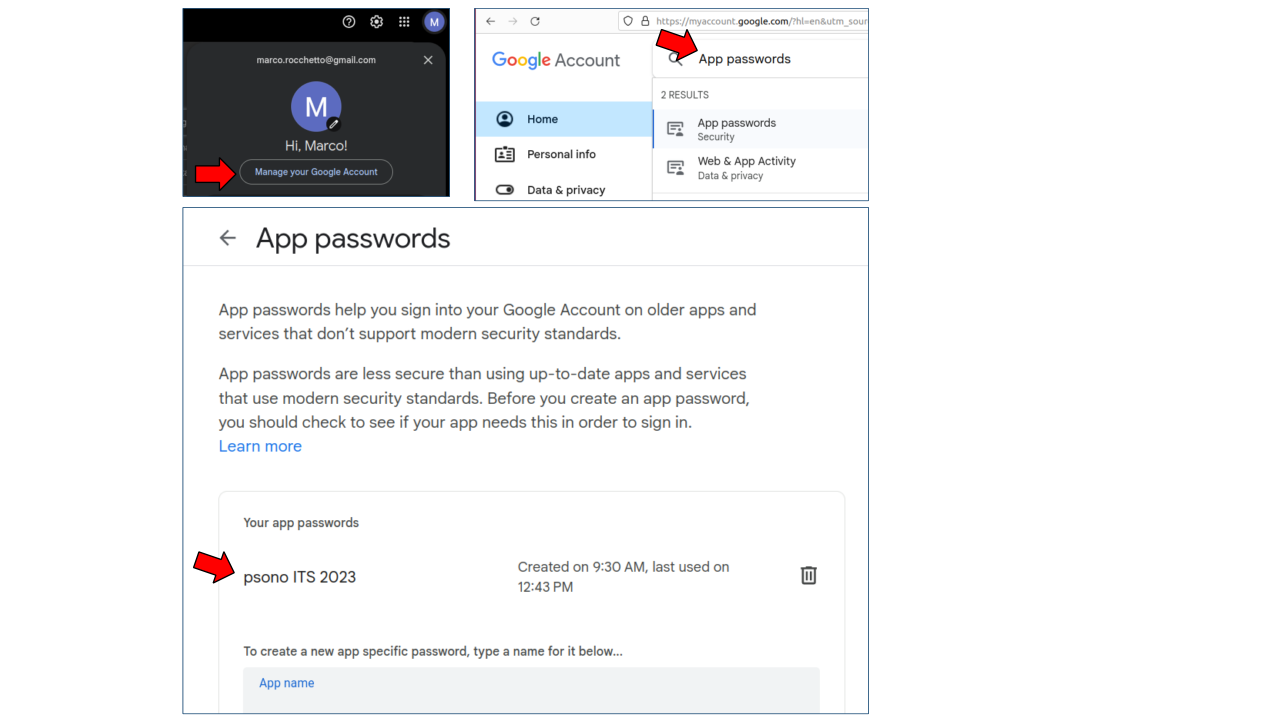
For the authentication process, Psono requires to have an email server (or service) available. While Tipimail or similar services could be used, for our experiment we’ll use our personal GMail account. The idea is to use our personal email account but without sharing our GMail password.
On your Gmail account, click on the icon (as in the following picture) of your user. Then click on “manage account” and search for “App passwords”. Now you can register a new password that can be used by Psono to send account activation emails using the Google SMTP service
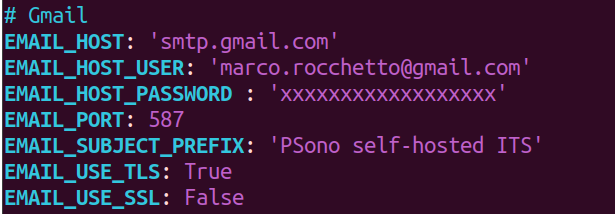
Now we can edit the Psono config file with vim /opt/docker/psono/settings.yaml
and add the following configuration (where the email and password must be changed with yours).
We can test that the email process works by running the following command in our VM (changing something@something.com with an email account you own. If, after executing the following command, you received an email, everything should be working properly.
docker run --rm \
  -v /opt/docker/psono/settings.yaml:/root/.psono_server/settings.yaml \
  -ti psono/psono-combo:latest python3 ./psono/manage.py sendtestmail something@something.com
Database Preparation
Psono requires a database to run. We can prepare the database using the (data migration](https://en.wikipedia.org/wiki/Data_migration) process that Psono publicly shares in the official documentation:
docker run --rm \
  -v /opt/docker/psono/settings.yaml:/root/.psono_server/settings.yaml \
  -ti psono/psono-combo:latest python3 ./psono/manage.py migrate
Backend Preparation
Finally, we setup the backend, which requires the following config file to be
stored in /opt/docker/psono-client/config.json (psono-client directory may
not exists, so use mkdir to create it).
{
  "backend_servers": [{
    "title": "Psono ITS 2023",
    "url": "https://psono.example.com/server"
  }],
  "base_url": "https://psono.example.com/",
  "allow_custom_server": true,
  "allow_registration": true,
  "allow_lost_password": true,
  "disable_download_bar": false,
  "authentication_methods": ["AUTHKEY", "LDAP"],
  "saml_provider": []
}
To run the docker container, exposing the backend we run the following command.
docker run --name psono-combo \
    --sysctl net.core.somaxconn=65535 \
    -v /opt/docker/psono/settings.yaml:/root/.psono_server/settings.yaml \
    -v /opt/docker/psono-client/config.json:/usr/share/nginx/html/config.json \
    -v /opt/docker/psono-client/config.json:/usr/share/nginx/html/portal/config.json \
    -d --restart=unless-stopped -p 10200:80 psono/psono-combo:latest
You can now test that everything is up and running by using the browser on your local machine and
open http://ip-of-the-vm:10200/server/info.
You can also check the health status of the containers with docker ps -a. If
you just started the backend you should see its health status as “starting”, it
requires a bit of time. If it becomes “unhealthy” but seems to be running
properly, don’t worry, we’ll fix it later on.

Troubleshooting
If your psono installation is not working you can first check the IP Addresses of the various containers and
- check that they all are on the same subnet (e.g.,
docker inspect psono-database | grep IPAddr*) - check that the settings.yml uses the correct database IP, as in the following picture
Cleanup Job
As required by Psono, a cleanup process must take place regularly. Open Cron with
crontab -e
and add the following.
30 2 * * * docker run --rm -v /opt/docker/psono/settings.yaml:/root/.psono_server/settings.yaml -ti psono/psono-combo:latest python3 ./psono/manage.py cleartoken >> /var/log/cron.log 2>&1```
Reverse Proxy
The Psono docs for the installation of a reverse proxy
uses NGINX. To install NGINX on your VM run: sudo apt install nginx.
Now create the following NGINX config file in /etc/nginx/sites-available/psono.example.com.conf.
Note here that I changed the location for the key and certificate (w.r.t. the original config shared in the psono documentation).
server {
    listen 80;
    server_name psono.example.com;
    return 301 https://$host$request_uri;
}

server {
    listen 443 ssl http2;
    server_name psono.example.com;

    ssl_protocols TLSv1.2;
    ssl_prefer_server_ciphers on;
    ssl_session_cache shared:SSL:10m;
    ssl_session_tickets off;
    ssl_stapling on;
    ssl_stapling_verify on;
    ssl_session_timeout 1d;
    resolver 8.8.8.8 8.8.4.4 valid=300s;
    resolver_timeout 5s;
    ssl_ciphers 'ECDHE-ECDSA-AES256-GCM-SHA384:ECDHE-RSA-AES256-GCM-SHA384:ECDHE-ECDSA-CHACHA20-POLY1305:ECDHE-RSA-CHACHA20-POLY1305:ECDHE-ECDSA-AES128-GCM-SHA256:ECDHE-RSA-AES128-GCM-SHA256:ECDHE-ECDSA-AES256-SHA384:ECDHE-RSA-AES256-SHA384:ECDHE-ECDSA-AES128-SHA256:ECDHE-RSA-AES128-SHA256';

    # Comment this in if you know what you are doing
    # add_header Strict-Transport-Security "max-age=63072000; includeSubdomains; preload";

    add_header Referrer-Policy same-origin;
    add_header X-Frame-Options DENY;
    add_header X-Content-Type-Options nosniff;
    add_header X-XSS-Protection "1; mode=block";

    # If you have the fileserver too, then you have to add your fileserver URL e.g. https://fs01.example.com as connect-src too:
    add_header Content-Security-Policy "default-src 'none';  manifest-src 'self'; connect-src 'self' https://static.psono.com https://api.pwnedpasswords.com https://storage.googleapis.com https://*.digitaloceanspaces.com https://*.blob.core.windows.net https://*.s3.amazonaws.com; font-src 'self'; img-src 'self' data:; script-src 'self'; style-src 'self' 'unsafe-inline'; object-src 'self'; child-src 'self'";

    ssl_certificate /etc/ssl/certs/fullchain.pem;
    ssl_certificate_key /etc/ssl/private/privkey.pem;

    client_max_body_size 256m;

    gzip on;
    gzip_disable "msie6";

    gzip_vary on;
    gzip_proxied any;
    gzip_comp_level 6;
    gzip_buffers 16 8k;
    gzip_http_version 1.1;
    gzip_min_length 256;
    gzip_types text/plain text/css application/json application/x-javascript application/javascript text/xml application/xml application/xml+rss text/javascript application/vnd.ms-fontobject application/x-font-ttf font/opentype image/svg+xml image/x-icon;

    root /var/www/html;

    location ~* \.(?:ico|css|js|gif|jpe?g|png|eot|woff|woff2|ttf|svg|otf)$ {
        expires 30d;
        add_header Pragma public;
        add_header Cache-Control "public";

        proxy_set_header        Host $host;
        proxy_set_header        X-Real-IP $remote_addr;
        proxy_set_header        X-Forwarded-For $proxy_add_x_forwarded_for;
        proxy_set_header        X-Forwarded-Proto $scheme;
        proxy_hide_header Content-Security-Policy;

        proxy_pass          http://localhost:10200;
        proxy_redirect      http://localhost:10200 https://psono.example.com;
    }


    location / {
        proxy_set_header        Host $host;
        proxy_set_header        X-Real-IP $remote_addr;
        proxy_set_header        X-Forwarded-For $proxy_add_x_forwarded_for;
        proxy_set_header        X-Forwarded-Proto $scheme;
        proxy_hide_header Content-Security-Policy;

        proxy_pass          http://localhost:10200;
        proxy_read_timeout  90;

        proxy_redirect      http://localhost:10200 https://psono.example.com;
    }
}
HTTPS - TLS Keys
As we learnt in the first course we can create a small PKI to handle this certificates for our testing purposes.
So we create our certificates using the following scripts (see previous course for more details).
Create and execute the following script
#!/bin/bash
mkdir PKI
mkdir PKI/certs PKI/csr PKI/private PKI/db PKI/crl PKI/conf
touch PKI/db/index
touch PKI/db/serial
touch PKI/db/crlnumber
echo "01" > PKI/db/serial
pwd
Find the openssl.cnf with find / -iname openssl.cnf 2>/dev/null. It should be in /etc/ssl/openssl.cnf. Copy it to cp /etc/ssl/openssl.cnf ./PKI/conf and change the file PKI/conf/openssl.cnf as follows.
[ CA_default ]

dir             = ./PKI                 # Where everything is kept
certs           = $dir/certs            # Where the issued certs are kept
crl_dir         = $dir/crl              # Where the issued crl are kept
database        = $dir/db/index         # database index file.
serial          = $dir/db/serial        # The current serial number
crlnumber       = $dir/db/crlnumber     # the current crl number
certificate     = $dir/certs/cacert.crt # The CA certificate
private_key     = $dir/private/cakey.pem        # The private key
crl             = $dir/crl/cacrl.pem            # The current CRL
x509_extensions = usr_cert              # The extensions to add to the cert
#unique_subject = no                    # Set to 'no' to allow creation of
                                        # several certs with same subject.
new_certs_dir   = $dir/certs            # default place for new certs.
Create and execute the following script to genreate the new TLS key and certificate.
#!/bin/bash

echo "Root CA - key"
openssl ecparam -name prime256v1 -genkey -outform pem -out PKI/private/cakey.pem
echo "Root CA - cert"
openssl req -new -x509 -days 365 -config PKI/conf/openssl.cnf -addext "subjectAltName=DNS:ca.its.com" -addext "certificatePolicies=2.5.29.32.0" -extensions v3_ca -key PKI/private/cakey.pem -out PKI/certs/cacert.crt -outform pem -subj "/C=IT/ST=Italy/L=Verona/O=ITS/OU=Students/CN=ca.its.com/emailAddress=itsec@its.com"

# INTRANET TLS
echo "psono.example.com - key"
openssl ecparam -name prime256v1 -genkey -outform pem -out PKI/private/psonokey.pem
echo "psono.example.com - csr"
openssl req -new -key PKI/private/psonokey.pem -out PKI/csr/psono.csr -config PKI/conf/openssl.cnf -addext "subjectAltName=DNS:psono.example.com" -addext "certificatePolicies=2.5.29.32.0" -subj "/C=IT/ST=Italy/L=Verona/O=ITS/OU=Students/CN=psono.example.com/emailAddress=itsec@its.com"
echo "psono.example.com - cert"
openssl ca -in PKI/csr/psono.csr -out PKI/certs/psonocert.pem -config PKI/conf/openssl.cnf -batch

cat PKI/db/index
chmod 400 PKI/private/psonokey.pem
Now we can copy the private key and the certificate to the VM and move it to the proper location
as defined in the NGINX config file psono.example.com.conf.
scp PKI/private/psonokey.pem x@192.168.1.12:~/privkey.pem
scp PKI/certs/psonocert.pem x@192.168.1.12:~/fullchain.pem
[ssh into the VM]
sudo mv ~/privkey.pem /etc/ssl/private
sudo mv ~/fullchain.pem /etc/ssl/certs
We can now enable the NGINX config we just created.
ln -s /etc/nginx/sites-available/psono.example.com.conf /etc/nginx/sites-enabled/
We can test it sudo nginx -t and finally restart the NGINX sudo service nginx restart.
Open your browser (on the local machine) and test if its working at: https://psono.example.com/server/info/.
You should see something like {"info":"{\"version\": \"....} as a response.
Unhealthy time out of sync
If you go to https://psono.example.com/server/healthcheck/ and the clock sync is unhealthy, dates are out of sync you should fix it.
[Explanation TBD]

Finalize - User Creation
The documentation on the final steps are provided by Psono
here.
Create the first user by registering a new user from the web interface at
https://psono.example.com/, and promote it to admin:
docker run --rm \
  -v /opt/docker/psono/settings.yaml:/root/.psono_server/settings.yaml \
  -ti psono/psono-combo:latest python3 ./psono/manage.py promoteuser username@example.com superuser
Enjoy your admin user https://psono.example.com/portal/.
You can now create a snapshot of your VM with the name Psono v0.1!
Non-Conformities Evaluation
The non-conformities evaluation is done by the IT Manager by verifying if the requirements of the password policy can be enforced by the technology under evaluation (i.e., the PSono password manager).
Here is the Non-Conformities Evaluation Spreadsheet which we send to the CISO so that he can evaluate the risks associated with the non-conformities and identify a mitigation strategy. For example, PSono does not allow an enforcement against the storing of passphrases. The CISO may choose to accept this non-conformity and extend the employment contracts with an “Individual User Agreement” stating that it is forbidden to store passphrases in PSono.
Cybersecurity Analysis
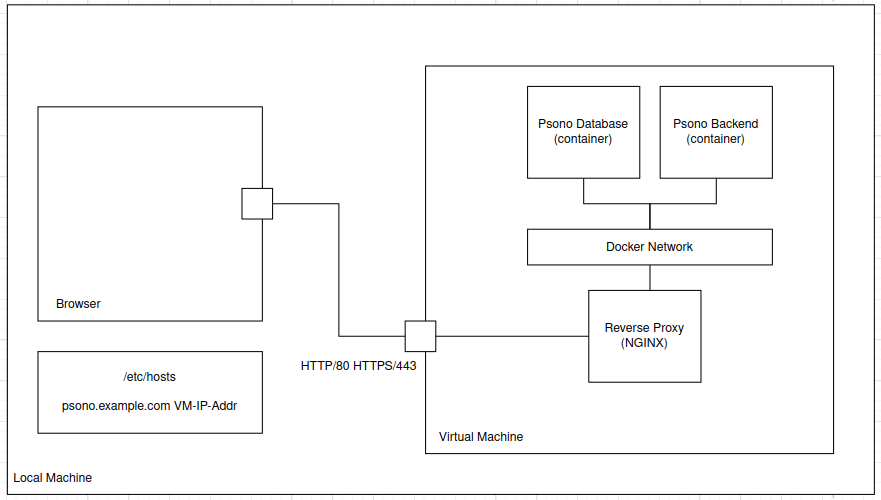
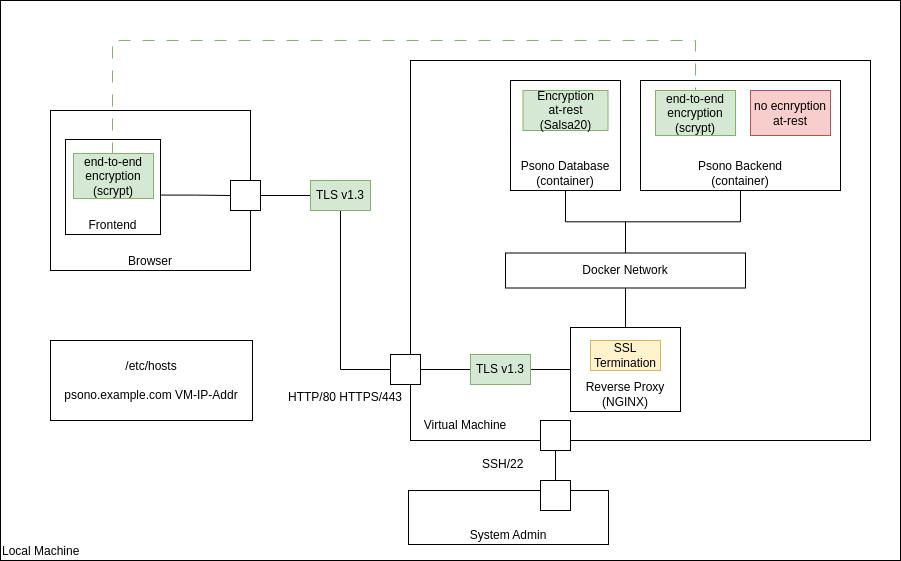
In this step we assess the cybersecurity of the PSono infrastructure.
- System Model: Design the architecture of the system under analysis
- Identify potential threats
- considering the information classification policy (For example, the secrecy requirements should make you investigate how secrets are used; in yml, passwords, certificates, configurations, user data etc.)
- For the threat assessment consider the sensitivity of information in-transit and at-rest wrt info classification policy
System Model
You can download the “source” Drawio Psono Architecture or use the following image.
Treat Analysis
You can download the Threat Analysis Spreadsheet HERE
Vulnerability Management
The ISO 27002 details the Vulnerability Management Control description of the ISO 27001. The following is an extract of the standard.
The organization should have an accurate inventory of assets (see 5.9 to 5.14) as a prerequisite for
effective technical vulnerability management; the inventory should include the software vendor,
software name, version numbers, current state of deployment (e.g. what software is installed on what
systems) and the person(s) within the organization responsible for the software.
To identify technical vulnerabilities, the organization should consider:

a) defining and establishing the roles and responsibilities associated with technical vulnerability
management, including vulnerability monitoring, vulnerability risk assessment, updating, asset
tracking and any coordination responsibilities required;

b) for software and other technologies (based on the asset inventory list, see 5.9), identifying
information resources that will be used for identifying relevant technical vulnerabilities and
maintaining awareness about them. Updating the list of information resources based on changes in
the inventory or when other new or useful resources are found;

c) requiring suppliers of information system (including their components) to ensure vulnerability
reporting, handling and disclosure, including the requirements in applicable contracts (see 5.20);

d) using vulnerability scanning tools suitable for the technologies in use to identify vulnerabilities
and to verify whether the patching of vulnerabilities was successful;

e) conducting planned, documented and repeatable penetration tests or vulnerability assessments
by competent and authorized persons to support the identification of vulnerabilities. Exercising
caution as such activities can lead to a compromise of the security of the system;

f) tracking the usage of third-party libraries and source code for vulnerabilities. This should be
included in secure coding (see 8.28).

The organization should develop procedures and capabilities to:

a) detect the existence of vulnerabilities in its products and services including any external component
used in these;

b) receive vulnerability reports from internal or external sources.
Implement Vulnerability Management
There are two possible scenarios: your company has its own product/server/service that needs to be protected or there’s a list of them.
First scenario
If there’s a service that is critical for the company, such as the password manager we just installed, the best strategy is to:
- list the software and hardware of the critical service
- check known vulnerabilities for all the listed software and hardware
The first item of the list requires us to create a BOM: Bill Of Material which should encompass:
- SBOM: Software bill of material
- HBOM: hardware bill of material
- CBOM: Crypto bill of material
- SaaSBOM
Usefull technologies to implement a BOM are:
Once the BOM is obtained, we can use OWASP Dependency Track to map the signatures of the items in our BOM with the known vulneabilies.
Second Scenario
- Install OpenVAS from HERE. Install the docker version unless you are using Kali.
- NESSUS