ls
ls
Cybersecurity
This is a git repository which is hosted on GitHub; a beautiful place where we learn together cybersecurity and what faith will bring us. In this README I write my notes of the course but much of the content is, for brevity, a link to external resources. If you have any suggestion to improve this text or the course, please open an issue.
Table of Content
- Lesson 1 - Intro
- Lesson 2 - A Small Step for a Man
- Lesson 3 - Authentication in Depth
- Lesson 4 - With Great Power Comes Great Responsibility
- Lesson 5 - Summary, Review, & Experiments
- Lesson 6 - Cryptography
- Lesson 7 - Bittersweet Farewell
Lesson 1 - Intro
Requisite (because it is a logical AND between all the following) to attend this course:
- Use the pen-and-paper approach to take notes during each lecture! This is the most important part of the whole course. If you don’t take notes, it is likely that you won’t remember what we have done. Mis-understanding will pile up in time and we won’t be speaking the same language very very soon (as you won’t understand what I’m saying).
- Study! If you don’t invest time in reading and reason on your notes (something like: “wait! I wrote integrity but what was the definition? let’s look on wikipedia) you can spare the effort of keeping notes in the first place. You have to spend your time in reasoning on your notes or you won’t understand what we are doing. At the beginning it may seem you can remember the whole blablabla of each lesson, but it is going to become ultra-complex in a bit. The difference between listening and understanding determines the distance that you have to walk in this course:
- listen,
- draft notes,
- review note with a critical mind (wikipedia, duckduckgo, google and marco@v-research.it are your best friends… Cicero too),
- believe you have understood something,
- test your believed understanding until you find a counter-example (how? talk to your best friend, and
- be vigilant forever after.
- Create a study group and study together because “When students study in groups, they can motivate and encourage each other and lessen procrastination”. Consider investing time (e.g., a couple of hours) after each lesson to review together the notes. Tell each other (even if it seems trivial) what we’ve done during the last lesson(s) and if it is all clear then:
- Relax. Take your time, stay away from your notes. Let them ripe.
We read and write poetry because we are members of the human race. And the human race is filled with passion. And medicine, law, business, engineering, these are noble pursuits and necessary to sustain life. But poetry, beauty, romance, love, these are what we stay alive for. John Keating, “Dead Poets Society”
What is Cybersecurity in the Context of this ITS?
What is something? What does it even mean to understand what something is? This is too long to be discussed here but there’s a friend who is willing to tell you… well, unfortunately he’s dead but he left you a precious book. We know that ideas on what a phenomenon is (or hypothesis) should be invented and not defined by observing the phenomenon.
”[…] and I think (like you, by the way) that theory cannot be fabricated out of the results of observation, but that it can only be invented.” Albert Einstein writing to Karl Popper.
So, cybersecurity cannot be understood out of the results of observation but, in this course, we are going to understand cybersecurity out of the results of observation anyway! Why? Because how could we even conceive to ask ourselves “what is cybersecurity?” if we didn’t stumble upon some “observation” or some situation in which cyber-insecurity was evident?
Ok, WAT?
For us cybersecurity is the CIA-triad (Confidentiality, Integrity, Availability), meaning that any system in which the CIA-triad holds is (for us) secure (enough). For simplicity, suppose a component of a system (e.g., a web-server) is talking to you (e.g., to your browser) by sending you some messages.
- Confidentiality holds if only the trusted peers (e.g., the web-server and your browser) can understand the content of the messages. Of course, it would be “more confidential” if not even the web-server and the browser would be able to understand the content of the messages but it would be pretty useless.
- Integrity holds when the trusted parties can understand if the message has been corrupted (accidentally) or altered (e.g., maliciously by an attacker).
- Availability holds when we are able to understand if a service (e.g., the web-server or a web-site) is “down” or not available.
Did you say attacker?
An attacker is what is usually, mistakenly called hacker. In this course we want to learn how to protect our system from a malicious cracker, someone who mainly wants to break the CIA triad and we call him/her attacker. An hacker, instead, is “a person who delights in having an intimate understanding of the internal workings of a system, computers and computer networks in particular. The term is often misused in a pejorative context, where cracker would be the correct term”. RFC-1392.
How do we guarantee the CIA-triad holds in a system?
Using the so-called Alice-and-Bob notation where Alice (A) and Bob (B) are honest and Eve (E) is the malicious attacker, let us suppose that Alice wants to send “ciao bob” to Bob.
To preserve confidentiality, Alice can agree with Bob upon using a specific transformation over each message. Let’s say, they will substitute each letter in the message by a letter at some fixed number of positions (which we call k) down the alphabet (aka Caesar cipher). So, the message “ciao bob” is transformed into “dlbp cpc” if k=1 and A->B:dlbp cpc will only be understood from Bob (since he’s the only one who knows how to translate the message back into its meaning - and we assume, for simplicity, that Eve is not so clever to figure out we are doing this “trick”).
MUHAHAHAHA! This does not preserve confidentiality as soon as I draw from my deck in attack position: frequency analysis. Long story short, letters in a sentence are bound to be used with a fixed frequency (which may vary from language to language). In Italian we have the following frequencies
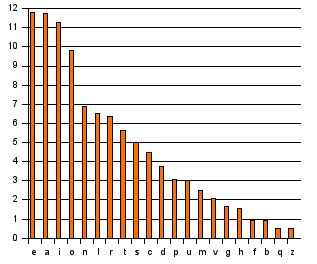
and if we see a message like “dlbp cpc” we may not know how to decipher it but what if listened to a whole conversation? Let’s try! Go to: cryptii/Caesar cipher and encode a message (e.g. in Italian). My message encoded was: Jphv Ivi, zvuv Thyjv. Cvslcv zvsv kpyap jol xbhukv buv zwvzah buh ivyzh, sh ivyzh zp zwvzah wlyjoé buv sh zwvzah l uvu ps jvuayhypv. Xbpukp uvu wvzzphtv kpyl jol buv zwvzah buh ivyzh wlyjoé sh ivyzh zp zwvzah th zvsv jol sh ivyzh zp zwvzah wlyjoé xbhsjbuv sh zwvzah. Ps wypujpwpv jhbzhsl è jvzh zlyph l s’ptwspjhgpvul mbugpvuh pu bu clyzv th uvu uljlzzhyphtlual hujol ulss’hsayv.
We can surely go to some tools like this and analyze the frequency and quite easily decrypt the message. We can also try all possible decryption with tools such as md5decrypt.net and, by clicking on “bruteforce” you will easily spot what I wanted to say.
- How can we guarantee integrity or availability? We’ll look into this in the following lessons.
Confidentiality In-Depth
First, some terminology:
- Alice wants to send the plaintext message: “ciao bob” in a confidential way to Bob
- Alice wants to encrypt the plaintext by performing some “transformation” that results in a ciphertext (i.e. encrypt(plaintext)=cipertext)
- Bob must be able to decrypt the ciphertext to get the plaintext (i.e., decrypt(encrypt(plaintext))=ciphertext)
Encryption, for us, is going to be an algorithm, a mathematical function, a process, a procedure, a… “who cares as long as it produces a ciphertext”. The objective of enccryption is to produce messages with high uncertainty. WAT?!
The message plaintext=”ciao bob” has no uncertainty meaning that anyone knows what it means: it is an informal greeting to a person named Bob.
By encrypting the plaintext we obtain a ciphertext with high uncertainty. With Caesar cipher (k=1) we obtained “dlbp cpc” and there is uncertainty over its real meaning.
However, by looking at the frequencies of the letters in the Italian alphabet we notice that with a bit of
frequency analysis there was no uncertainty really. How do we guarantee this uncertainty then? The answer is cryptic: OTP=XOR but let me explain with an example:
- Translate the plaintext into a bitstring using the ASCII table to convert the characters into numbers (
man ASCII).plaintext=099105097111 098111098=01100011011010010110000101101111011000100110111101100010. - Take a random bitstring (with the same length as the binary version of the plaintext) where random means “uniformly distributed”. This means that if you have a set of N bitstrings, each bitstring has a probability of 1/N to be chosen.
- Now I predict that: XOR(plaintext, random)=ciphertext
The XOR (or eXclusive OR) is a logical connective that returns True/1/OK if (and only if) the two terms where it predicates are different.
- XOR(1,1)=0
- XOR(1,0)=1
- XOR(0,1)=1
- XOR(0,0)=0
You can see that 50% of the time the XOR outputs 1 and 50% 0. So, if we perform XOR(Message, Random), where Message and Random are 1 bit long, and we keep Message fixed (say 1), what is the frequency of bits produced by this XOR? In other words, if we look at the output of a software implementing XOR(1, Random) we see something like (incremental output, with Random generated randomly by my brain):
- XOR(1,1)=0
- XOR(1,1)=00
- XOR(1,0)=001
- XOR(1,0)=0011
- XOR(1,1)=00110
- XOR(1,0)=001101
- XOR(1,0)=0011011
- XOR(1,1)=00110110
The first input of the XOR is fixed but the XOR still outputs 0 or 1 with 50% probability. Given that the random bit is freshly generated at each iteration, we cannot by frequency analysis get the plaintext from the ciphertext. Ok but, what if I try all possible keys? Doesn’t this allow me to decrypt the message? Nope! With the Caesar cipher we have (in english) 26 different keys but here the number of keys is much higher. If you look at the great example on Wiki page on OTP (One Time Pad) you will notice 4 things:
- One Time Pad is exactly what we used so far with the XOR(Plaintext, Random).
- Multiple possible meaning will result from decrypting with all possible keys and we’d not know which one to pick.
- We were wrong in saying
encryption(Message)=ciphertextbecause we need a key as inencryption(Message, Key)=ciperhtextwhich must be shared among the trusted peers of a communication. - A key is a random bitstring in OTP.
Our Security Goal
In this course we will focus on the security of a Postgres database. Why? Because it offers us the possibility to study the security of data-at-rest (i.e., the data stored into the db), the security of data-in-transit (i.e., the data transferred when we communicate, using a client, with the db), and some security principle such as the Principle of least privilege. Furthermore, a database is often one of the most important assets (since it contains most if not all the data of a system), Postgres is one of the most used software when it comes to database, and it is quite easy to install & configure.
Do you speak techy?
- have a decent computer (we can give you one if your is “old” or “tired”)
- Install a virtual machine (e.g. VirtualBox with Ubuntu 20.04 - Why? Because you don’t want to “try” something on your computer. You are going to make a mess (we are explorers! and sometimes wanderers) and you don’t like re-installing the OS on your computer.
- A Virtual Machines (VM) is a software virtualization of a computer. You create a new “virtual computer” inside your real computer. So you can trash the virtual computer if you mess up and your real computer won’t even notice.
- You can take a snapshot of a VM and you can go back to that snapshot (e.g., if you mess up). So, take a snapshot right after having installed Ubuntu and you can go back to a clean Ubuntu installation whenever you want.
- Install PostgreSQL on the VM.
sudo apt updateupdates the links from which Ubuntu will search for softwaresudo apt install postgresqlwill install the latest version of PostgreSQL supported by the OS (on Ubuntu 20.04 is v12)sudo systemctl status postgresqlyou can check the status of the PostgreSQL process (it should be active and running)sudo systemctl stop postgresqlyou stop the PostgreSQL process (guess what happens substituting start or restart to stop)
Lesson 2 - A Small Step for a Man
Cybersecurity deals with guaranteeing or breaking the CIA-triad. Blue teams try to build secure systems where the CIA-triad holds, while other security experts try to hack the system. But the blue team is protecting from what the hackers have found to be insecure. Obviously, if you are protecting yourself from something, you first have to know what that something is. Well, this isn’t actually true and the whole scientific approach is doing the opposite by predicting future events that have never be seen before. But, again, we are explorer and, as explorers, we are braver rather than “methodological” :)
Now, let’s look closer to what cybersecurity is. For example, suppose you (Alice) write a secret diary with a friend of your (Bob). This diary could be one of those diaries with a cute, small, heart-shaped lock, or a cold software program that asks for a a password to be unlocked. But let’s use the physical diary. The communication protocol is simple, you wrote your own RFC with your friend:
- Alice writes secret things in the secret diary
- Alice closes the secret diary with the small, cute lock
- Alice gives her sister (which we could call Honest? Network) then locks the diary and sends her to Bob
- Bob gets mad because Alice didn’t give her sister the key to unlock the diary
Now, Alice doesn’t trust her sister but she’s too lazy to walk to Bob and finally
- Alice gives her sister the key
- Her sister is a malicious attacker and opens the diary breaking the confidentiality of the writings
- Her sister gives the diary AND the key to Bob
- Swap Alice with Bob and Bob with Alice and loops 1-3.
In Alice-and-Bob notation is shorter: A -> B: secret.diary And that -> means that secret.diary passed through a communication medium (e.g. the Internet) and the . simply means we are concatenating secret with diary.
This story teaches us quite a few things:
- Alice, Bob, and Her sister are all happy. The sister because is evil and is reading the whole “secret” diary, Alice and Bob because they don’t know the secrecy or the confidentiality is not guaranteed by their protocol.
- Confidentiality is a property that you want to guarantee but it doesn’t tell you how to guarantee it.
- Things like locks seems to be useful but it is not straightforward (mostly for the lazy ones) to use them.
So, the first rule of cybersecurity is: get to know the system you want to secure. If Alice or Bob did spend a bit of time looking at their protocol, they would have figure out the hack by themselves. Try to “hack” your system or, better, have a critical mind when you look at anything, you may find that it is not as stupid, not as trivial and boring as you first assumed. You may find an entire universe in something you didn’t consider worth of your time. Like, we all assume God (or the concept of God, or Gods, or Oracles, etc) as omnipotent but we hardly figure out that as human being we cannot understand the concept of omnipotent. We think we know what we are saying, it’s trivial… it just means “he can anything, anytime, anywhere etc”… he can even build a rock that he himself cannot lift… wait… but if he canNOT lift it, is he omnipotent?
PSQL, Unix Socket and IP Address
So, to create a secure system, we must first explore the system. And our system is PostgreSQL (or postgres for brevity).
- What is PostgreSQL? A RDBMS.
- But, with our cybersecurity mindset, is just like any other system. It is software that is run as a server/service and accepts connections from a client.
psql (a software) is a client that allows us to connect to the PostgreSQL server that we installed in the 1st lesson.
Open a terminal in your ubuntu VM and let’s play with it.
psql --helpshows you some interesting info, like-Upsql -U postgresconnects to the postgres server with the userpostgresbut asks for a password… what is the password?
By default, during the installation process postgres configure a user postgres and creates a database postgres.
The user postgres isn’t just a user inside the postgres server (or client), it is also a new user of your system. So, there are two users postgres, one in Ubuntu and one in PosgreSQL.
sudo su postgresasks the superuser (with the imperativesuperuserdo), who is the “administrator” of your Ubuntu, that you want to becomepostgresand it opens a terminal as postgres (try runwhoami).sudogives you a challenge and asks for your password (not the one of postgres) because it trusts you and assumes that whoever knows your password is you.
So, we don’t need to know the password of the postgres user.
- type
exitand go back to your user sudo -u postgres psqlaskssudoto runpsqlas the-userpostgres. And we are connected to postgres.
Wait… Connected? How?
Postgres supports two types of connections from our psql client: via unix socket or via the network specifying an IP address. For us, unix sockets just allow a connection “internal” to the pc, meaning that it connects the input/outpout of the two software locally to our computer.
psql -U postgresuses unix socketspsql -U postgres -h 127.0.0.1uses the IP127.0.0.1to connect via the network.
Actually, 127.0.0.1 is a local IP address. It is a “trick” that you can use
to test a software that you’d want to use via network one day soon… but that you are
testing locally. 127.0.0.1 is a special IP address given to your network
card by any operating system (OS, Ubuntu too). Any software sending
packets/messages to 127.0.0.1 asks the network card to process the packet as
if it were coming from the internet but sends it back to the OS without passing
through the network.
Hacking
Any hack requires an intimate understanding of a technology so, let’s get to know postgres better.
sudo systemctl status postgresqlshows the status of the server/service postgres. It should be active, telling you it’s running but is it running ok?sudo less /var/log/postgresql/postgresql-12-main.logshows you the log of postgres, so you can check if everything is ok. (I’m using v12, you may be using a different version).ls /etc/postgresql/12/main/shows you the content of the dir that contains all the configuration files of postgresless /etc/postgresql/12/main/pg_hba.confshows you the different access type. It’s well documented, just read the comments.sudo nano /etc/postgresql/12/main/pg_hba.confand edit the file, modifyingpeerintotrustfor the local access using unix socketpsql -U postgreswon’t ask you any password now, because it trusts that you are connecting securely… or it doesn’t actually care about security.psql -U postgres -h 127.0.0.1still asks you the password because you are trusted only if you connect via unix sockets
For more fun, please have a look at the PostgresSQL documentation (I link you a random page, but you can click your way to the table of content).
Authentication and Authorization: “We are not the A of the CIA-triad”
We used two important terms in this lesson: trust and authentication. Trust is a basic notion in security. It is always there when you talk about security because you have to trust someone or something. If I tell you I’m Marco you can trust me, you can ask my mom and trust her, you can check my ID and trust our nation, you can test my DNA and that of my parents and trust a random lab, etc. Cybersecurity tries to reduce this trust to the minimum. Authentication “is the process of verifying the identity” while identification (which is important too) is “the act of indicating a person’s identity”. A password is usually used to identify and an authentication process checks the password that it takes as input against the result of some process (e.g. by looking at a table in the database - and this is a hint for the following questions).
Take home message: security properties are nice and we now know some of them (CIA, authentication, identification, trust) but the technology that we use to guarantee a security property often comes with extra requirements. For example, an authentication process implicitly asks you to save your password in a secure place (security of data at rest and, again, asks security for security), to share a password in a confidential way (data in transit), or to create a complex password (why?).
While authentication is concerned with the integrity of the data sent by a user by not just requiring that the data have not been altered but also that they have been produced by a specific user/identity, authorization deals with the confidentiality of data. Authorization “is the function of specifying access rights/privileges to resources, […] and to authorize is to define an access policy”. An authorization mechanism aims at protecting the confidentiality of data, limiting the (read) access to the data that a user is authorized to read.
Do try this at home!
- What is the authentication process of PostgreSQL? How does it authenticate the user
postgreswhen we usepeer(for example)? - Authentication is a sub-property of integrity. Can you figure out why?
Her sister cries and cries… She hurries in her father’s room, tells him she read the secret diary and that Alice wrote her sister is ugly (tanto va la gatta al lardo…). So Alice hears that her sister read her secret diary and she gets mad! Not because she cares about her sister but because she felt stupid, she messed up with the only secure thing she had and, most importantly, she knows she’s too lazy to give herself the key to Bob. Her father has an idea.
- Alice puts the secret diary in a box and closes the box with a lock
- Her sister takes the box but she cannot open it because Alice kept the key, so she gives it to Bob
- Bob add another lock to the box and gives it to the “Her sister” (ndr I should have give her a name, poor thing)
- Her sister takes the box but she cannot open because Bob kept the key, so she gives it to Alice
- Alice removes her lock with her key. She can’t open the box because of Bob’s key and she gives it to her sister
- Her sister again cannot unlock Bob’s key and gives the box to Bob
- Bob removes the last lock and gets the secret diary
- The lived securely ever after
Lesson 3 - Authentication in Depth
Authentication is a fundamental concept in cybersecurity since it allows us to
“mechanize” the process of giving our identity to a system so that the system
can provide us with the content we want. What a system authenticates is not
the identity of a person but the credentials given by a client (i.e., of a software
that implements a client, for example, the software client psql). The reason
why we don’t authenticate the person behind the client but the client itself
is simple: we must assume that the person behind the client is willingly and consciously
providing us the identification credentials, e.g. username and password. In other words,
we trust the person, not the client. Therefore, we want to authenticate the client.
- Execute the command
whoami(in a BASH shell) it outputs the name of the user you are operating on your Linux system (e.g. my user is namedx). - If you execute
psql -U postgres(assuming that the config filepg_hba.confhas the local access set totrust, i.e.,psqldoesn’t run an authentication process and then it doesn’t asks for a password) you asks your user (x) to runpsqlwhich, in turn, asks to log-in to the postgres DBMS as the userpostgres. - Once we are connected to the DBMS, we can execute
ALTER ROLE postgres WITH PASSWORD 'ciao';(remember the semicolon) to change the password of the user postgres in the DBMS to “ciao”. Note: ROLEs and USERs are considered the same concept in postgres, no big deal
Now we can finally ask some security questions:
- data at rest: Is the password of the user postgres stored securely?
- data in transit: Is the password exchange between client (
psql) and server (postgres DBMS) secure? - Is the password “ciao” a secure password?
We know security means CIA-triad but only questions 1. and 2. seems to make sense (w.r.t. the CIA-triad) so, let’s start from them.
Security of Data at Rest
In the authentication process between psql and the DBMS, the DBMS is the
system which verifies the authenticity of the credentials (username and password)
provided by psql. So, the DBMS must have the pair username and password (e.g., postgres,ciao)
stored somewhere. Remember that the DBMS is a collection of databases (db), so:
psql -U postgres\?to see all the commands you can provide to postgres (/databaseto search the keyword “database”)\lto list al the db (it shows a db namedpostgres)\c postgresto connect to the db namedpostgres\dto list the tables… but it doesn’t show any credential table… because this table is, by default, generated for any new instance of the DBMS and only tables created by us are shown with\d.- But with
\dS+we can see all the tables, even those not created by us (\authto search in the output of\dS+the tables which deals with authentication). SELECT * FROM pg_authidshows the content of the table which we can refine withSELECT rolname,rolpassword FROM pg_authidto get the credentials (username and password) of the postgres user.
The password is not stored as “ciao” but with a string similar to md52e2af93edc9ab3aea6bbf13b7c409000. Passwords are not stored in cleartext in postgres. This guarantees confidentiality since we cannot understand the password by looking at the stored string representing the password. There are many processes (or algorithms) that we can use to transform the password ‘ciao’ into an incomprehensible text, and the one used by postgres is:
- written in the
postgres.conffile aspassword_encryption=md5andmd5is the algorithm used, and - one may change the algorithm set in the
posgres.conffile by connecting to the DBMS and executingALTER SYSTEM SET password_encryption TO scram-sha-256and- we can check the current algorithm by running
SHOW password_encryption(SHOW allshows all the parameter you can set and check). - or simply edit the
postgres.conffile and restart postgres withsudo systemctl restart postgresql.
Cryptographic Hash Functions
md5 is “a cryptographically (broken but still widely used) hash function”. An hash function (or, more precisely, a cryptographic hash function) is
- a mathematical algorithm that maps data of an arbitrary size (often called the “message”) to a bit array of a fixed size (the hash value, or hash)
- It is a one-way function, that is, a function for which it is practically infeasible to invert or reverse the computation (i.e., from the password you can get an hash but from the hash you cannot obtain the password),
- it is deterministic, meaning that the same message always results in the same hash,
- it is infeasible to generate a message that yields a given hash value,
- it is infeasible to find two different messages with the same hash value,
- a small change to a message should change the hash value so extensively that a new hash value appears uncorrelated with the old hash value (avalanche effect).
So, basically, given the md5 hash of “ciao” (md52e2af93edc9ab3aea6bbf13b7c409000) we cannot write a program that obtains “ciao” (unless, obviously, the program knows a-priori “ciao”). And this is what allows us to store the hash of a password in a database and, at the same time, to guarantee the confidentiality of the cleartext password (“ciao”).
Password Best Practice v1
Some hash functions, such as MD5, calculates the hash quite fast (you can calculate around 9 billion MD5 hash per second with a regular PC). This makes MD5 susceptible to a cybersecurity attack known as brute-force attack. The idea is simple, if we obtain the MD5 hash we can write a program that automatically computes the hash of all possible passwords and compare each hash with the one “stolen” from the db. Let’s try all the 4 characters long password, how many are them? We have:
- 26 letters A-Z
- 26 letters a-z
- 10 digits 0..1
- let’s say 10 special characters (‘$’,’#’, etc.)
So with a password with lenght 4 we have (26+26+10+10)^4=72^4=26873856 (almost 27 milion) possible passwords. If we can compute $10^10$ MD5 hash per second it takes us up to $210^33$ seconds which is a very, very, very long time. But what if people were lazy and only used, say, a-z letters? Well, if you do the math, you see that in a week we got the hash. This is why it is important to choose a strong password where *a strong password is not just a long password but a password which is chosen from a rich alphabet (our 72 possible character). A brilliant video on passwords by Cormac Herley (Microsoft Research) is this.
Brute-force and Dictionary Attack
Before trying to de-hash the MD5 hash we note that there is another type of attack named dictionary attack where, instead of brute-forcing all the possible password we use a “dictionary” with the most common passwords (as 0000, admin, password, postgres etc.). So, don’t choose a “supercanifragilistichespiralidoso” and not even “sup3rc4n1fragilisti” because they can be guessed quite easily and cracked by a dictionary attack.
If you want to play a bit with dictionary attacks here is what you need:
- a dictionary
- John the ripper if you want to try another password cracker.
- with hashcat you can use
-a 0mode or-a 1to combine from multiple wordlists. We now focus on brute-force attacks, so that we can play a bit and get a sense on why they always say to have a password length 8 and not, say 6.
To perform the brute-force attack we use hashcat, the “wordl’s fastest password cracker” etc etc.
sudo apt install hashcat- copy the MD5 hash in a file
echo "2e2af93edc9ab3aea6bbf13b7c409000:user" > ciao.hash(here remember to drop the “md5” at the beginnning of the hash and to substituteuserwith the correct username) hashcat -a 3 -m 12 ./ciao.hash -o output.txtwhere-a 3is for brute-force attack,-m 12selects Postgres md5, (seehashcat --helpfor more information) returns the password “ciao” in a file namedoutput.txtin a minute at most!
Note that:
- based on the password you want to crack hashcat requires you to use a specific mode and a specific format of the input file you give to hashcat. The format is available here.
hashcat -a 3 -m 12 ./ciao.hash -o output.txt ?a?a?a?atells hashcat to perform a mask attack wich optimizes the brute force, reducing the password space. In this case we say that the password length is 4 (to speedup the cracking process).- you can run
hashcat -a 3 -m 12 ./ciao.hash --show(after you have cracked the password) to see the password in cleartext.

Now, try to create longer and longer password and see how slow this process becomes. It is due to the exponential nature of the password space: adding 1 more character to your password will increase exponentially the number of possible password. For example, a password with lenght 4 (assuming the alphabet as we did before) has a password space of 72^4, with length 5 is 72^5 and with length N we have 72^N.
There are hash algorithms which are purposely slower in computing the hash to prevent the brute-force attack (such as bcrypt which should be preferred to MD5 - plus MD5 has also serious flaws and should not be used - but it is not supported by postgres and the best we can do is use sha-scram-256.
Obviously, it’s difficult to get the hash from the database, can we obtain it from the communication between psql and the DBMS during the client authentication?
Security of Data in transit
Executing psql -U postgres -h 127.0.0.1 it is required to enter the password
‘ciao’ (if md5 is set in the pg_hba.conf for this connectionType-user
pair). The password is hashed (with md5) and sent to the DBMS. So the md5 hash
transits on the network (which is currently simply the loopback but stil our
message goes from the client to the network card and then from the network card
to the DBSM). Actually, there is a series of messages that are exchanged
between the DBMS and the psql client but we are not digging into this
protocol.
Sniffing Attack
- Install wireshark, a software that analyzes and shows
the network traffic with
sudo apt install wireshark. - Execute
sudo wiresharkand select the loopback to start sniffing the traffic from your loopback
Sniffing is the act of reading the data in transit
in a network and if we authenticate with psql -U postgres -h 127.0.0.1 (and we stop collecting network traffic)
we can see all the messages exchanged over the loopback and we can find the messages communicated
during the authentication process. However, we cannot find the hash of “ciao” because, by
default, postgres encrypts all the communication using SSL.
SSL and Cryptography
Connect to the postgres DBMS and run SHOW ssl; to see that SSL in postgres is active (on).
If you run SHOW all; and search for ssl (/ssl) you see that:
- the library used to implement ssl is
openssl - the protocol version is
TLSv1Unfortunately, ssl was the name of the first version of this algorithm, afterwards its name was changed inTLS(currently has 3 versions 1.1, 1.2, 1.3). So, while postgres uses the SSL keyword we are using TLS. For now, we just need to know that TLS is a “cryptographic protocol designed to provide communications security”. This means that the messages are processed by TLS (which is implemented in thepqslsoftware by using the libraryopenssl). and transformed into what is called a ciphertext, i.e. a text/message where confidentiality is guaranteed. Summarizing:psql -U postgres -h 127.0.0.1asks for a password- the user types “ciao” (cleartext where confidentiality is not guaranteed)
- the keyboard transfers “ciao” via UNIX sockets to the program
psql(as cleartext) psqlruns MD5 on it, obtaining an hash of “ciao” where confidentiality if guaranteedpsqlruns TLSv1 to encrypt the hash into a ciphertext where the confidentiality of the hash (not of the cleartext) is guaranteed So, even sniffing the traffic we cannot obtain the hash of the password.
Let’s try our previous attack after setting the option ssl_enabled=off in the postgresql.conf file and restart sudo systemctl restart postgres.
You’ll see that one of the messages contains an md5 hash. Can you get the cleartex password with hashcat?

Passwords and Best Practices, for Real this Time
Please note that md5 is insecure and scarm-sha-256 should be used instead.
Edit your postgres.conf and set password_encryption = scram-sha-256. This
hash algorithm still doesn’t provide brute-force protection but it
doesn’t have the technical security flaws of md5.
Useful resources:
CAPEC
You may have noticed that I used the CAPEC website to provide reference for the attacks mentioned. It is a database of most cybersecurity attacks known.
Lesson 4 - With Great Power Comes Great Responsibility
Everyone knows that power and responsibility go together “like the horse and carriage” but really… please, don’t be stupid! We use tools and techniques that may “attract” you into the dark side but there are SERIOUS consequences if you start craking things here and there. So, let’s use the material of this course to hack and not to crack which means that you can setup scenarios and see if you can hack your way in, but don’t run the tools and technique against other people and their devices. As Carl Sagan famously said “it underscores our responsibility to deal more kindly with one another and to preserve and cherish the pale blue dot. The only home we’ve ever known”.
The objective of this lesson is to put everything together and hack into our Postgres database in a real-world scenario where:
- Alice’s machine with IP
172.16.10.10is the client and usespsql -U postgres -h 172.16.10.20to connect to - Bob’s machine with IP
172.16.10.20where the PostgreSQL DBMS (i.e. the server) is running
NOTE In the following, the images shows different IP addresses than the ones in the text and, also, messages where the from and to fields have the same IP address while in the text two different IPs are used. I hope this doesn’t make the meaning of the text unclear, I’ll improve the images ASAP.
Setup (Step 0)
Bridge vs NAT
Since we are using a VM, remember to set the network adapter to bridge. Why? By default, the network adapter of our VM is set to NAT which basically creates a local network in your VM with a set of IP addresses that is different from the one of the local network to which your real computer is connected. In other words, if we’re Alice, using ifconfig in you VM you’ll see an IP address e.g., 10.1.7.10 and on your real machine you’ll see 172.16.10.10. Unless you configure it properly, Bob won’t be able to connect to 10.1.7.10 since he’s on a different network.
From VirtualBox:
- right-click your VM from the list of VMs,
- Settings -> Network
- Change “Attached to” from NAT to “Bridged Adapter”

Ping
Check the IP addresses of both Alice and Bob and ping Alice from Bob’s machine and vice versa (to be sure they “see each other”). From Alice’s machine run ping 172.16.10.20 and from Bob’s machine run ping 172.16.10.10.
If things are working properly you should see something like this:

If things are NOT working:

PostgreSQL configuration
sudo vim /etc/postgresql/12/main/postgresql.conf(you can always usenanoinstead ofvim) and:ssl = off– we’ll re-enable in the next lessonlisten_address ='*'– remember to remove the#at the beginning of the file to de-comment it.
sudo vim /etc/postgresql/12/main/pg_hba.conf- enable connections from every IP address (
host all all 0.0.0.0/0 md5). Here the 0.0.0.0/0 means “every IP address”. You should get apg_hba.conffile as the following.
- enable connections from every IP address (

Where is Everybody? (Step 1)
Ok, this is our first real step. We now become Eve, another machine on the same local network (IP 172.16.10.66), and we want to hack into Bob’s db but how do we know the IP of Bob or Alice?
Alice (Step 1.1)
Bob is easy to spot! He has PostgreSQL as a service running on his machine and this is advertised to anyone.
You can use nmap to scan all the hosts on your local network. So, as Eve we can run nmap 172.16.10.*.
Under Bob’s IP you’ll see something like:

that tells you that he’s running the DBMS on the 5432 port.
Bob (Step 1.2)
Alice is not that easy since she’s not running a server but a client and if we scan the network we may not be able to find her.
So we must be patient and set our network card in promiscuous mode and check the traffic
until we see a PGSQL request. You can use ip link set [net_card] promisc on where you use your network card name instead of [net_card] (use ifconfig to find out the network card name – you may have multiple cards so use the one with the correct IP address).
By filtering on the PGSQL protocol in wireshark, when Alice’s connects, you’ll see something like this

Sniffing and MITM (Step 1.3)
Now that we got their IP, just to have fun, we can run a Man-in-the-Middle Attack. We actually, already have the message exchange of the PGSQL protocol (which we’ll inspect in a while) but we also want to have a more “permanent” position in-between Alice and Bob. We want that all the traffic between them pass through us, through our network card.
We can exploit a weakness of the ARP protocol that is a protocol that is used to associate MAC and IP addresses. A MAC address is the identifier of the network card, while the IP address is the identifier of a computer in a network. Due to technical reasons, if you convince Alice that Bob’s IP address is associated to your MAC address (and Bob that Alice’s IP is associated to your MAC), all the messages exchanged between Alice and Bob will actually be sent to you (and you will forward them). So, you’ll be a (Wo)Man-in-the-Middle. The technique we use to perform such attack is ARP Poisoning.
NOTE: ARP poisoning works only between IP address on the same subnet. For example, it works with IPs: 172.16.21.1 and 172.16.21.2 but not with IPs: 172.16.7.1 and 172.16.21.2.
NOTE 2: check that sudo cat /proc/sys/net/ipv4/ip_forward returns 1. Otherwise, when you run a MITM attack you won’t forward the traffic between the two hosts you are attacking. You can set the ip_forward to 1 by editing the file. If it doesn’t work, edit /etc/sysctl.conf and uncomment net.ipv4.ip_forward=1 and then (if you don’t want to reboot) run sudo sysctl -w net.ipv4.ip_forward=1
sudo apt install ettercap(I know… we should use bettercap, which is better)sudo ettercap -G- select the interface and click on the
V(accept) at the top of the ettercap window - ettercap menu -> hosts -> scan for hosts
- ettercap menu -> hosts -> host list and search for the IP addresses of Alice and Bob which you can add as Target 1 and Target 2 respectively
- ettercap menu -> target -> show targets to confirm that Alice and Bob are our target
- mitm menu -> ARP Poisoning (and wait… it takes a while to convince Alice and Bob that we are Bob for Alice and Alice for Bob)
- if you go to ettercap menu -> Plugins -> manage plugins you have a lot of fun plugins to load like
isolateorremote_browserbut don’t be lamer.
Now we can finally use wireshark and filter on the IPs (in filters ip.addr == 172.16.10.10) and see all the traffic. But since we are interested in PGSQL, we can leave pgsql in the filter form of wireshark.
Read the PGSQL exchange (Step 2)
A fun overview on how PostgreSQL authenticates clients is given here but we focus on md5.
The firs interesting message is the one selected in:

where we get to know the user and db names (among other things). Why? Because the credentials (using md5) exchanged are computed as md5(md5(password + postgres_user) + salt) where the salt is a random string that prevents the rainbow table attack. So, if we know the user and the salt, we can use hashcat to get the password.
In this message you see the salt:

And in here the hash, which is not the hash of the password but the hash calculated as md5(md5(password + postgres_user) + salt) where md5 is our hash function.

Brute-force the HASH (Step 3)
Hashcat has a specific mode to crack the md5 we just captured (mode 11100) and hashcat expects a file with the hash to crack. If you go here you see the format of the file that hashcat wants and:
- remove md5 from the hash captured
- $user$usersalthash such as:
$postgres$postgres*9f47b50c*2e4c0b97c5740978d3a08a896a3e7703in my case. echo "$postgres$postgres*9f47b50c*2e4c0b97c5740978d3a08a896a3e7703" > psql.hashto save the string into thepsql.hashfile.hashcat -a 3 -m 11100 ./psql.hash ?a?a?a?a

DONE!!! We got the password and we can connect to Bob with
psql -U postgres -h 172.16.10.20
Take-home Message
- USE SSL! SSL encrypts the communication and so you can’t easily extract the hash
- This is just a test and many many other hacks can be performed. Some we don’t know yet (zero-day).
- Reduce the permissions of the client user to the minimum. You should not allow your clients to connect as superuser because if they are cracked, you give the cracker full access. If the client user postgres is cracked and
- has read-only access, he can only break confidentiality
- has write access, he can also break integrity
- can create/drop table… well, the availability of the whole db is at risk
NOTE: PostgresSQL offers 3 types of authentication protocols: password which sends unencrypted passwords, md5 which we just tested, and SCRAM-SHA-256 which can be used as a password exchange mechanisms even on unprotected (e.g., without TLS) networks. Check the Postgres documentation here

ROLES and PERMISSIONS
It is a good practice to follow the Principle of least privilege
and to create a ROLE (a user) which is not as powerful as the superuser. For example, a client may
not be allowed to create a new database or drop databases, similar for tables etc., an example follows.
Connect to postgres with psql -U postgres and run the following.
CREATE USER nonSuperUser WITH NOCREATEROLE NOINHERIT NOBYPASSRLS PASSWORD 'strongPassword' VALID UNTIL '2023-01-31';
REVOKE ALL PRIVILEGES ON SCHEMA public FROM nonSuperUser;
GRANT USAGE ON SCHEMA public TO nonSuperUser;
GRANT SELECT, INSERT, UPDATE, DELETE ON ALL TABLES IN SCHEMA public TO nonSuperUser;
GRANT ALL PRIVILEGES ON ALL SEQUENCES IN SCHEMA public TO nonSuperUser;
Lesson 5 - Summary and Reviews and Experiments
Summary
- A system is secure if the properties of the CIA-triad hold.
- Authentication is another security property (we’ll see later on how to use encryption instead of checksums to better understand why authentication is a sub-property of integrity).
- What a client-server architecture, such as the one with
psqlas a client for a PostgreSQL RDBMS server, is. - How hash are used to generate random tokens (strings such as md52e2af93edc9ab3aea6bbf13b7c409000) from passwords.
- Hash of passwords can be sniffed form the network if
ssl=off, withssl=onwe can’t (more on this in the next lessons) - Weak passwords can be brute-forced with
hashcatfrom sniffed md5 hash, breaking the authenticity of the client (from the server perspective). - This password can be later use to break the confidentiality of the data at-rest in the db and, if the role of the client allows, also their integrity or availability.
- A local network using ARP is insecure against a MITM attack which may allow an attacker to break confidentiality, integrity, and availability of data in-transit.
- Some technicalities, such as:
- MD5 is broken, use
scram-sha-256even if they are both insecure against brute-force. - Passwords must be chosen from a rich alphabet and not susceptible to dictionary attacks.
- The principle of least privilege
- MD5 is broken, use
Review 1: Network Stack, ARP protocol and MITM Attack
We looked at some network traces with wireshark focusing on PGSQL but what are the other sections of the packets?
If you are already familiar with the ISO OSI or TCP/IP models you can skip this section. Please note that for the sake of simplicity I’ll use a mix of the 2 standard models (for those who knows the models: I’m using TCP/IP model except for the link layer where I use the ISO OSI model distinguishing between PHY and MAC layer).
Otherwise, please be aware that I’ll just give the intuition, without many details which I believe are not useful for this introduction to cybersecurity.
Application Layer
Suppose that alice wants to say ciao to bob.
In the beginning, alice creates ciao and a new message ciao is born in the application layer.
The application layer is an abstract concept that represents the protocols used by the applications (software) in our computer.
For example, our browser uses HTTP(S) at application layer or we have used PGSQL at application layer.
Layer 1 - Physical Layer
The first problem is that we have ciao in our mind and we can even write it down on a
piece of paper or in a file in a computer, but we must somehow transform ciao
from a digital message in our
computer into an analog signal
so that we can transfer it to bob. In other words, if we have a fiber cable
from alice to bob, alice must first transform ciao into light signals, or
if we have an Ethernet cable it works as in the following (incredibly elegant) image.

This is what is done by the protocols at physical layer: there are a set of software/hardware that translates a message into an analog signal, based on the type of port used (e.g. Ethernet/RJ45, USB, WiFi, …).
This serie of videos is great if you want to know more on this layer.
Layer 2 - MAC Layer
So far so good but, what if we want to communicate with more than just one Bob?
Instead of connecting Alice’s cable directly to bob we connect both alice and bob to a layer 2 switch which is an hardware component that keeps track of the association between
an identifier of the hardware network interface (ethernet in our case). To do so, the switch “writes” in a table
the relation between its ports and the MAC addresses (which are the identifiers of the physical interface of Alice and Bob)
that are sending messages to that port.

This is what is done by the protocols at mac layer: the address of the network interface of both sender and receiver are concatenated to the application data so that the physical layer can encode the whole message to the switch. The switch will look at its table to route the message to the recipient by looking at
- the mac address of the recipient in the messages it receive from a sender, and
- looking at the table MAC-PORT
Layer 3 - IP Layer
We can’t have a cable from a PC to one switch port per each connection. What if we want to connect multiple PC to a single switch port? Of course we can’t add an ultra complex structure of switch layer 2! As we introduced an address for the hardware interface, we introduce an address to identify the PC in a network and we call this IP address.

Layer 4 - TCP Layer
It may be that I have multiple services running on my PC, let’s use a number (e.g. 5432 for postgres) to identify each service. Here we introduce the concept of TCP port which are NOT physical port but virtual port associated to each one of our services. So that we can send a message for a specific service by adding the TCP port of the service (5432 for postgres).

ARP and MITM
The ARP protocol works at layer 2 and the switch layer 2 only works at layer 1 and 2. The swithc layer 2 doesn’t even look at information above layer 2 and then it doesn’t look at the IP addresses or TCP ports etc. When we perform a MITM attack (as shown in the previous lesson) we convince, for example, Alice that the MAC of Bob is our MAC (note that your PC has a table similar to that depicted for the switch – run the following command to see yours arp). The switch looks at the MAC to forward the messages so we’ll receive all the messages that Alice wants to send to Bob if the MITM is successful.
Experiment 1: Replay Attack
In a replay attack, an attacker re-uses a message from one session of the protocol in another session. For eaxmple, we may open a connection between psql (client) and postgresql (server), capture the PGSQL message exchange with wireshark.
By looking at the PGSQL authentication protocol (using ssl = off and md5) using wireshark we can confirm that the protocol works like this:
1. Client -> Server: username
2. Server -> Client: salt
3. Client -> Server: md5(md5(username.password).salt)
So, can we open another session of the PGSLQ protocol and re-send the message with the credentials (e.g., with Bit-Twist), captured with wireshark (message 3. above)? We can but we won’t bypass the authentication process since the server
- takes the stored
md5(username.password)and thesalt - calculate the md5 hash
md5(md5(username.password))and compares with the one received by the client.
Since we are re-using a message from a previous execution of the protocol, the salt will be different and the server will reject our authentication message.
Review 2: Hash and Confidentiality
On the other hand, if the PGSQL protocol did not use salts, it would indeed be vulnerable to replay attacks even if the password is never sent as plaintext but always hash-ed. So, what is md5 protecting? and what is protecting it from?
Sending an hash of a password for authenticating a client, if sent as plaintext, is not so much different from sending the password itself al plaintext. Without a salt, PGSQL is just calling the hash of the password, the authenticating credentials. What the hash protects here, is the confidentiality of the password from the server [note], but why? Suppose you are using the same password on 2 different services ser1 and ser2. If ser1 is owned by a malicious attacker, the attacker won’t be able to re-use your hash of the password to authenticate on ser2 as if he were you.
[note] that it may even protect the confidentiality of the password form the client but since we type our password in plaintext in the client through the keyboard, the client knows our password. If we type an hash of a password, the problem becomes circular and what was the case fo client and server is now the same with the user and the client.
Exercise: SCRAM-SHA-256
- change md5 to scram-sha-256 in both the
postgres.confandpg_hba - restart the server
- capture the PGSQL message exchange and compare them with
md5.
Test replay attacks and brute-force attack on credentials.
Note that in /var/logs/postgresql you can find the log of the postgresql server (with errors in case the configuration/server is not working).
Lesson 6 - Cryptography
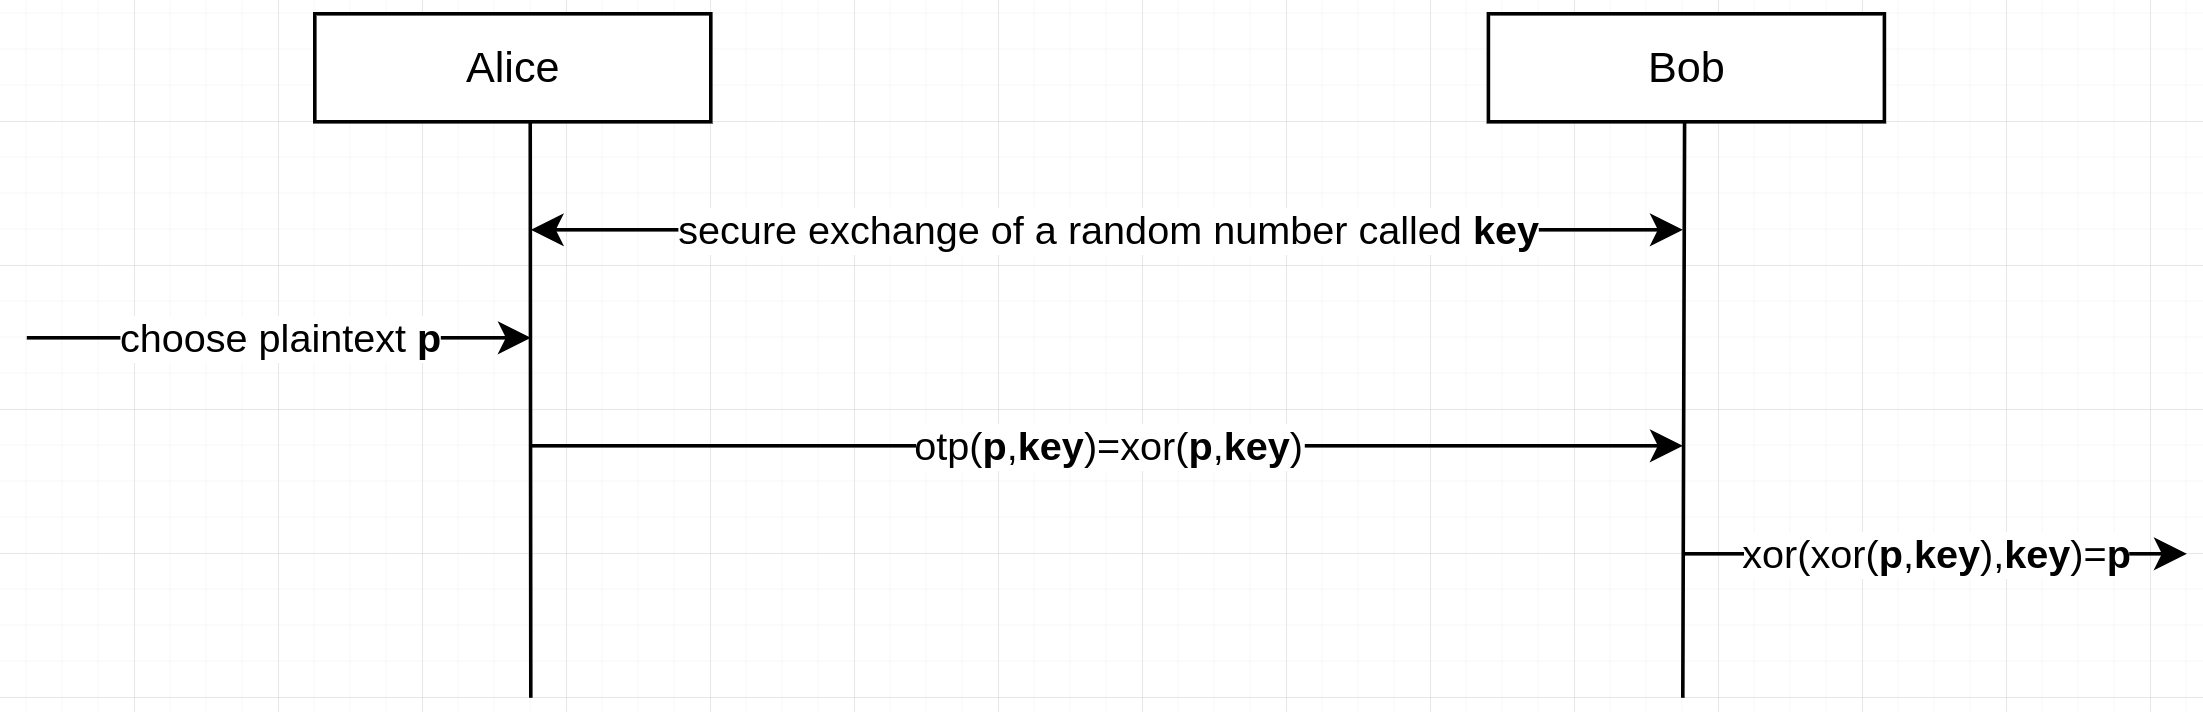
We already discussed how OTP works by encrypting a plaintext into a ciphertext to preserve
the confidentiality of the plaintext (alice:
otp(plaintext,shared-key)=xor(plaintext,shared-key)=ciphertext) when, for example, we want to send it
through a non-secure network (alice->bob:ciperhtext). That method, however,
requires that the peers (who are exchanging the ciphertext) know a common shared
key (bob: otp(ciphertext,shared-key)=xor(xor(plaintext,shared-key),shared-key)=plaintext).
The shared key must be private (i.e., shared only among those who are allowed to read the plaintext)
and anyone with the shared key can decrypt the ciphertext into the plaintext.
Pictorially:
 Now we are going to explore how that “secure exchange of a random number called key” can be done using asymmetric encryption.
Asymmetric Encryption
One of the method (well, algorithm) that can be used to share a private key is RSA. RSA is an asymmetric crypto system, while OTP is symmetric. All cryptosystems, like OTP, that uses a shared key are called symmetric and RSA does not work like OTP. The idea of RSA is the following:
- Both Alice and Bob generate a pari of keys, one is called public key (
pk(alice)), and the other private key (pvt(alice)). The pair of keys is built so thatrsa-decryption(rsa-encryption(plaintext,pk(alice)),pvt(alice))=plaintext). In other words, what is encrypted with the public key of an agent, say Alice, (rsa-encrypt(plaintext, pk(alice))=ciphertext) can only be decrypted with the private key of Alice (rsa-decrypt(ciphertext, pvt(alice))=plaintext)) - The public key is made public (e.g., publicly available from the personal website of both Alice and Bob) so that Alice and Bob can download the public key of the other agent (and we represent it as if Bob sent his public key to Alice
bob->alice: pk(bob)and Alice to Bobalice->bob: pk(alice)). - Alice chooses a shared key for OTP and sends it to Bob encrypted using RSA (
alice->bob: rsa-encrypt(shared-key, pk(bob))). - Bob decrypts Alice’s message with his private key (
bob: rsa-decrypt(rsa-encrypt(shared-key, pk(bob)), pvt(bob))) obtaining the OTP shared key. - The shared key is then used for the confidential communication between Alice and Bob.
NOTE: OTP requires a new fresh key per each message but one may send, along with the encrypted message a new key as, for example, alice->bob: otp(plaintext.new-shard-key, shared-key) where the “.” in the message represents concatenation. However, OTP is here only used as an example and many other symmetric encryption schemes such as AES exist.
Why can’t Alice and Bob continue using RSA instead of switching to a shared encryption scheme (OTP/AES)? Because asymmetric encryption is computationally more expensive than symmetric encryption and then it is only used (e.g., in TLS that is used to secure HTTP communications into HTTPS communications) to share a symmetric key.
Finally, we can depict an RSA exchange.
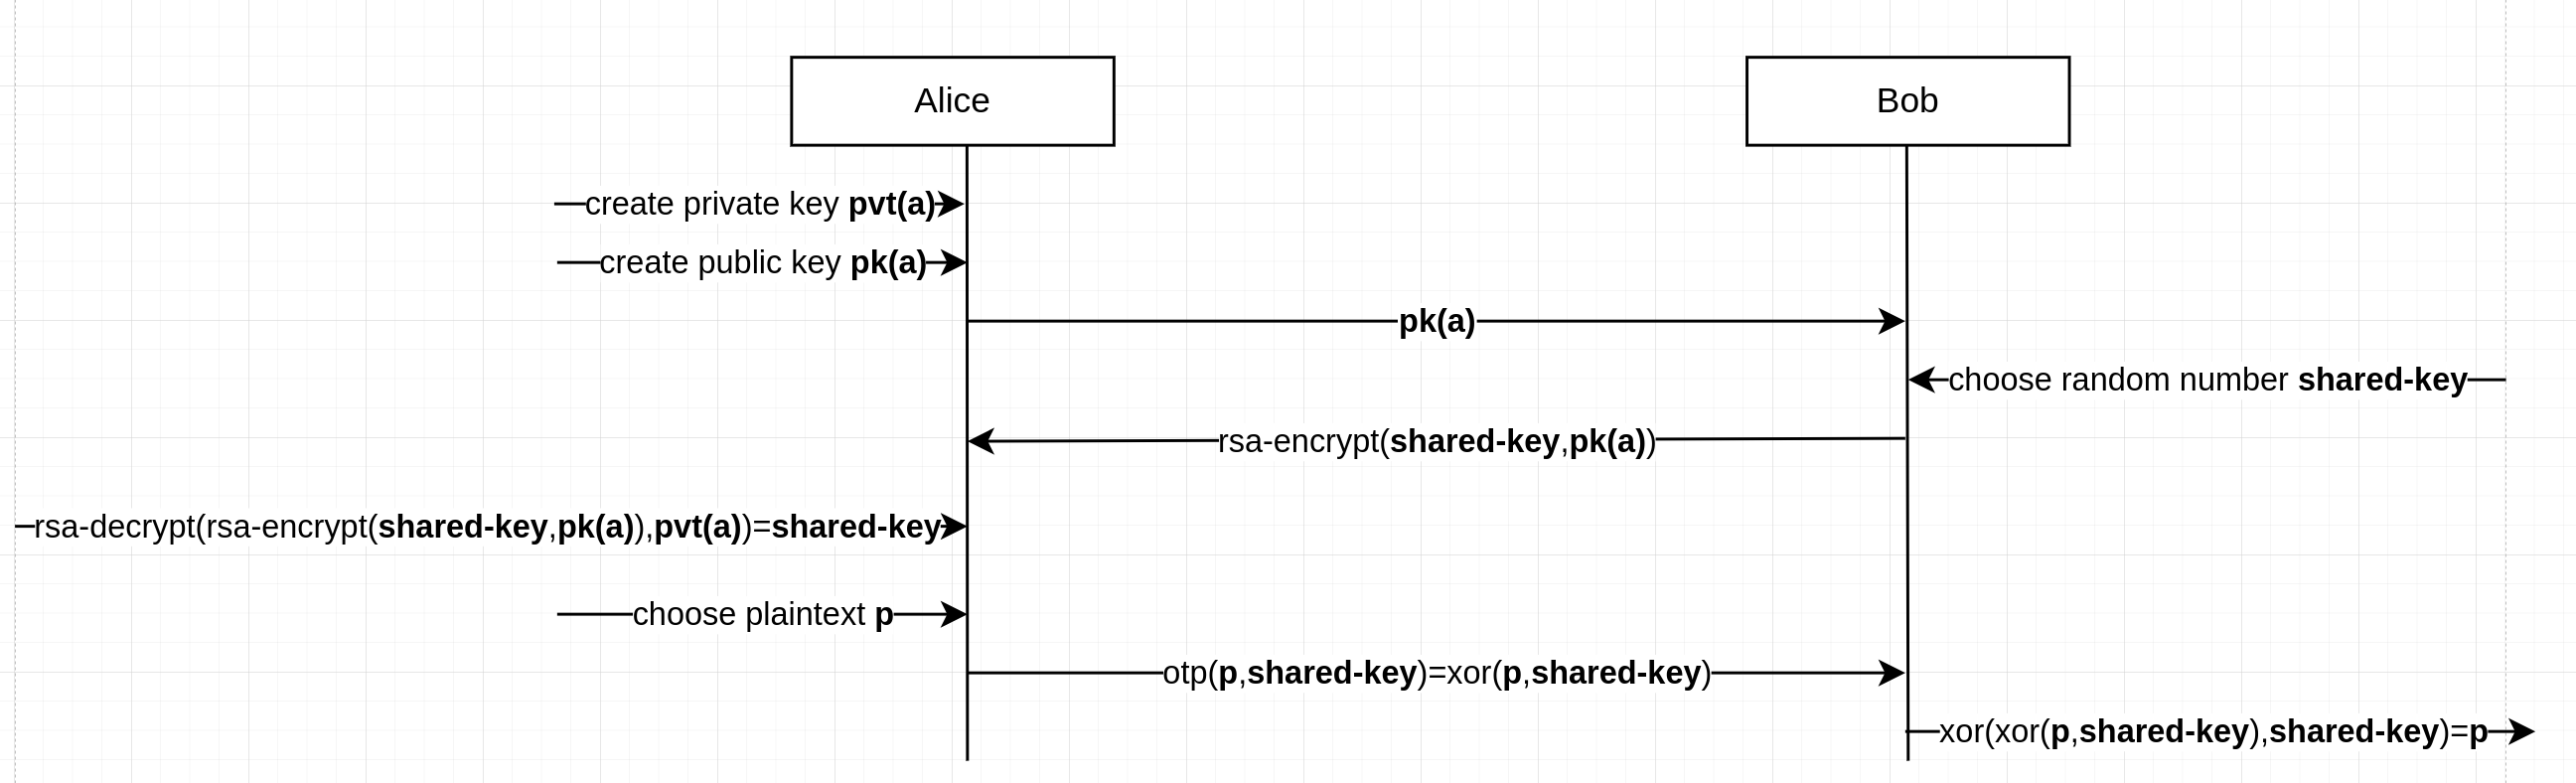
Which security properties are preserved with RSA? The confidentiality of the messages encrypted with the public key
Signature with Asymmetric Encryption
Given that the private key (which is only known by Alice), is simply a number
as any other key, what makes a key private or public is just the fact that one
has been kept private while the other has been shared publicly. Therefore,
Alice can choose a plaintext and “encrypt” it with his own private key (alice:
rsa-encrypt(plaintext,pvt(alice))).
The public and private keys in RSA are mathematically (as we are going to
see afterwards) related so that:
- if we encrypt with the public key we can decrypt with the private key, and
- if we encrypt with the private key we can decrypt with the public key.
The public and private key are simply two numbers and are often
described as one the “inverse” of the other (i.e.,
pk(alice)^-1 = pvt(alice))
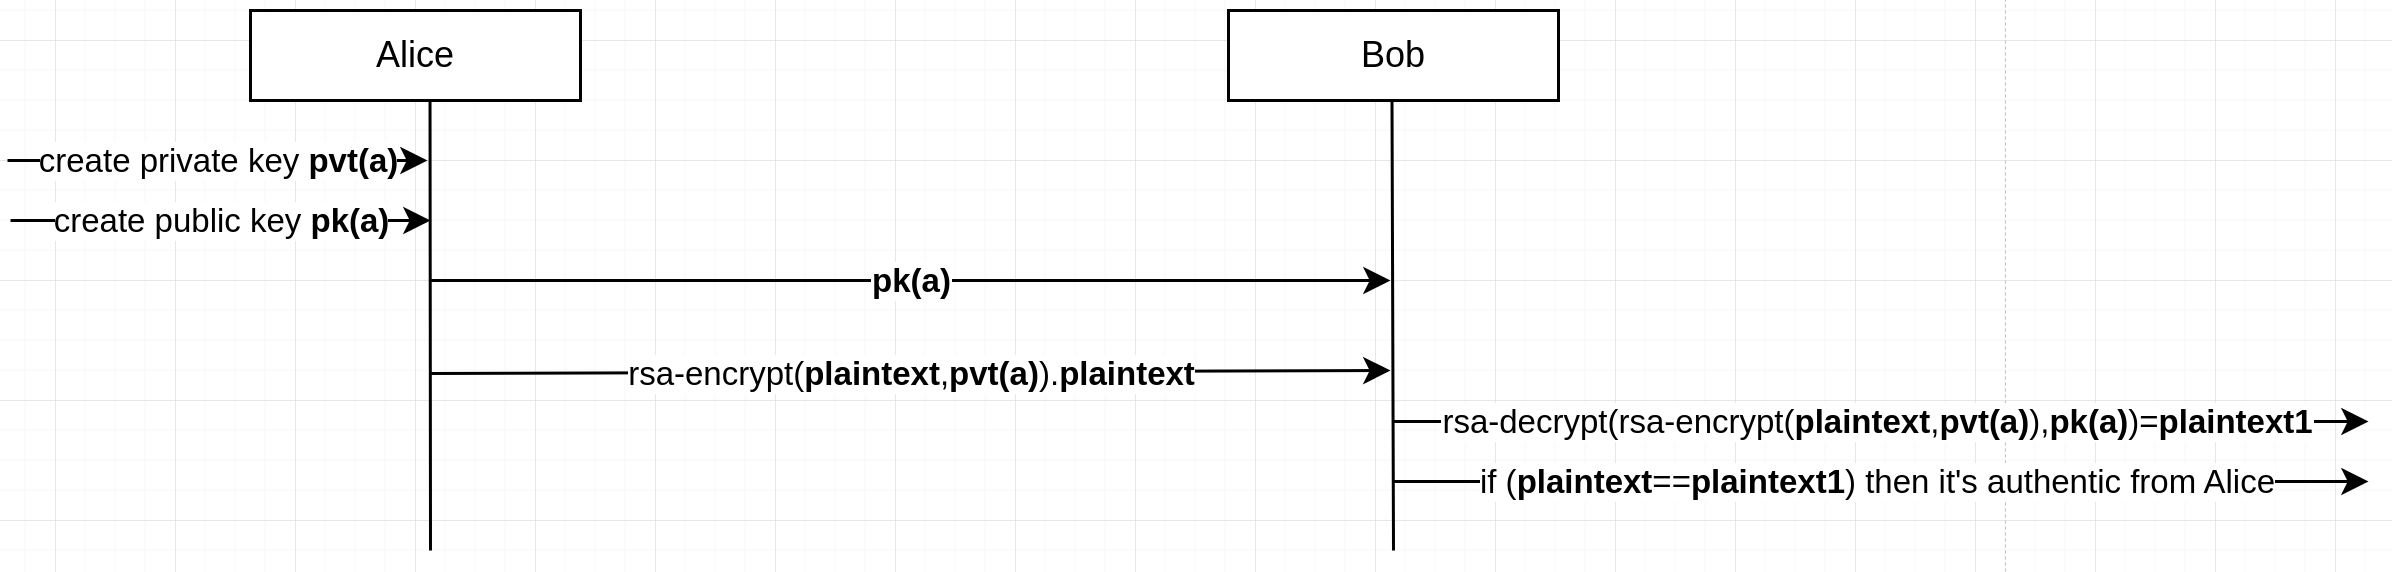
Obviously the confidentiality of the plaintext is not preserved when encrypted with the private key. Instead, authentication (and then integrity) are preserved. The process of encrypting with the private key is called sign. Why?
alice -> anyone: rsa-encrypt(plaintext,pvt(alice)).plaintextwhere.is a concatenation.- Anyone can decrypt the message
anyone: rsa-decrypt(rsa-encrypt(plaintext, pvt(alice)), pk(alice))=plaintextand verify that the plaintext so obtained is the same as the one Alice sent concatenated with the encrypted one.
So, the encryption with the private key is usually called signature and preserve both the integrity and the authenticity of the message. Why integrity? If you can verify that I am the one who sent a message you can also verify that the message has not been altered (e.g., by a man-in-the-middle) and then that integrity is preserved. Encrypting with the private key is really signing a message.
Pictorially:
A Bit of Math on RSA
In this section we follow Asymmetric Encryption - RSA by Enrico Gregorio (Prof@UniVR) [Italian].
- Alice chooses 2 (usually big but here we don’t for the sake of clarity)
prime numbers
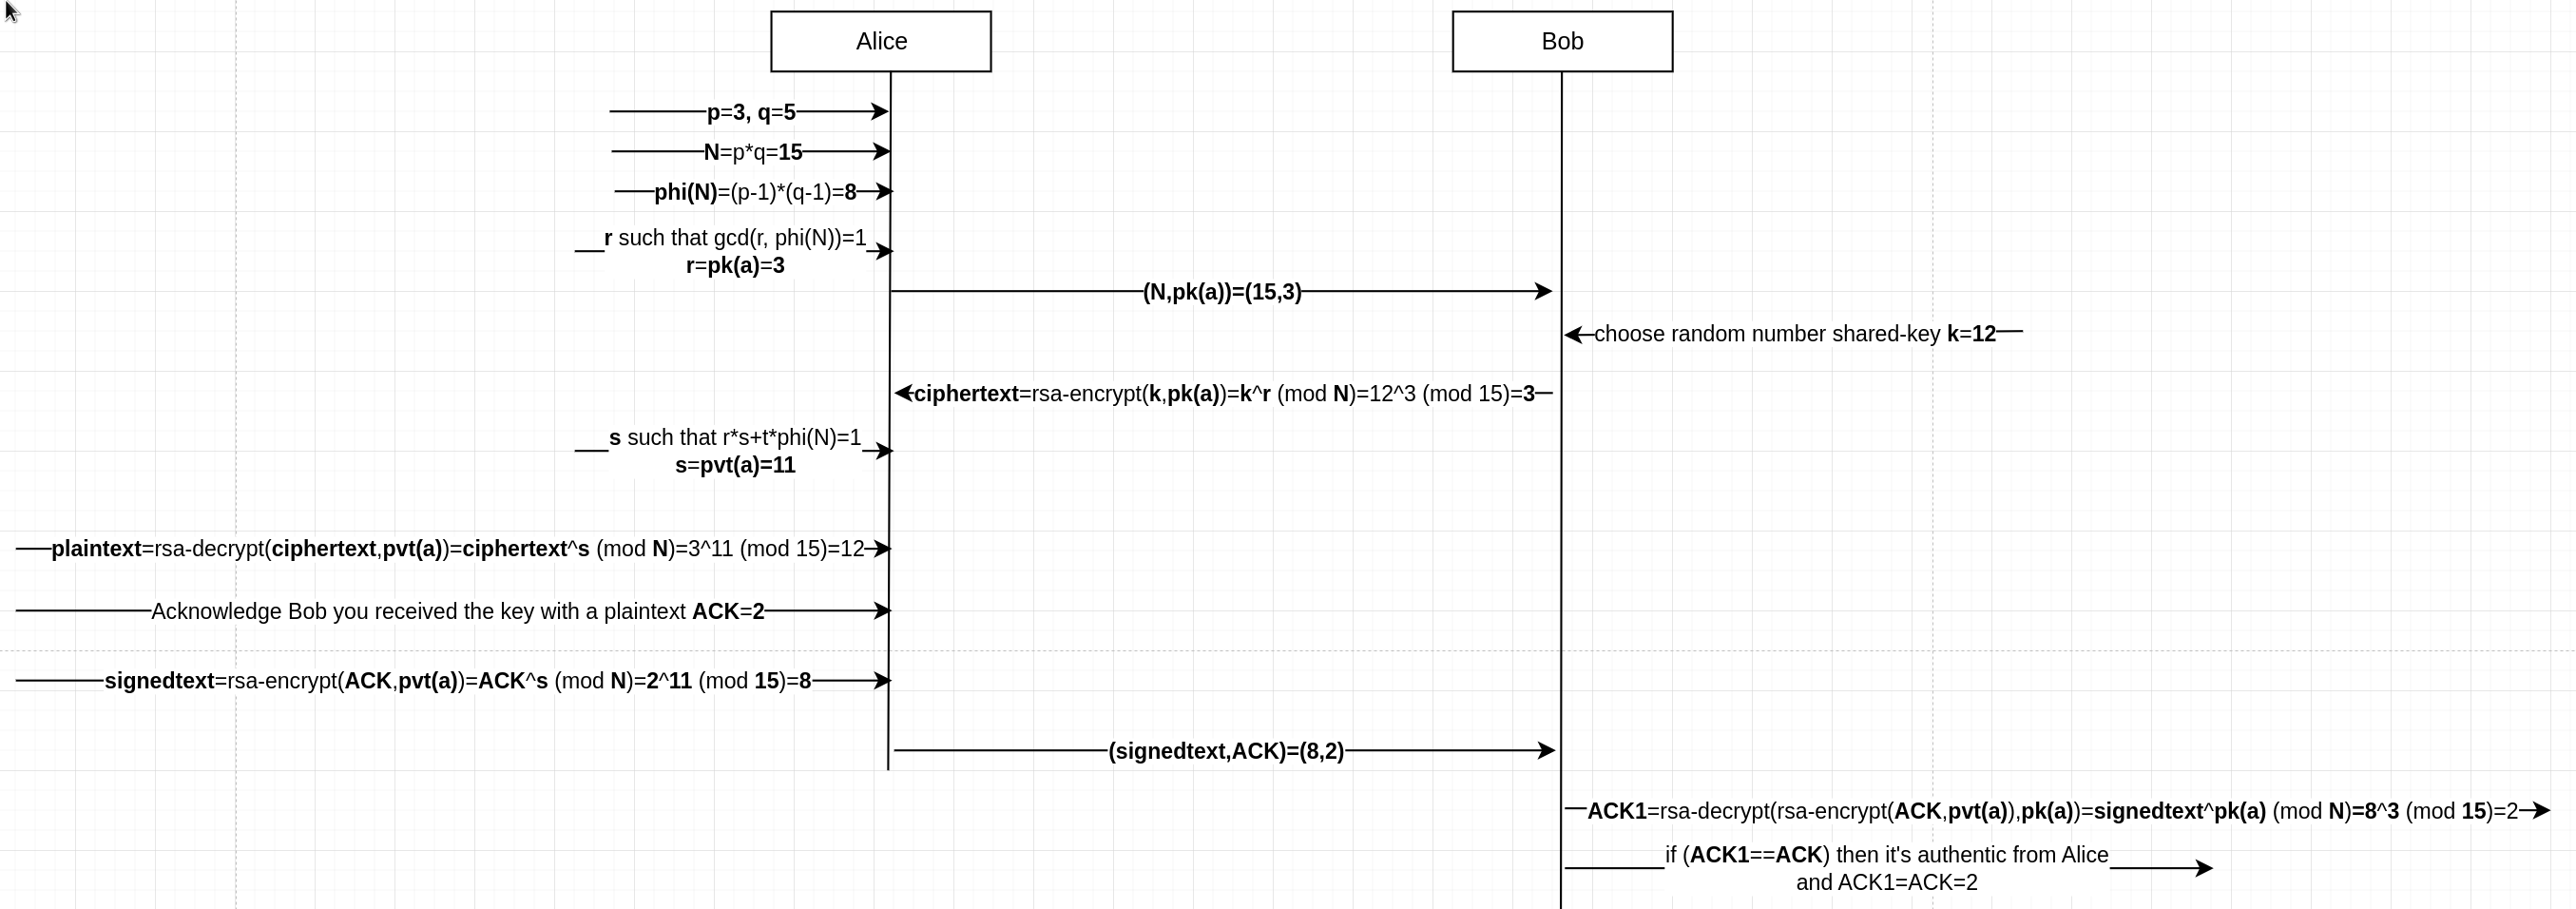
p=3andq=5and calculatesN=pq=3*5=15. She also calculates a magic numberphi(N)=(p-1)(q-1)=2*4=8. Finally, Alice chooses a numberrsuch thatgcd(r, phi(N))=1, i.e. the greatest common divisor is 1, and thenrandphi(N)are coprime. Summarizing Alice has:p=3, q=5, N=15, r=3(and 3 is coprime with 8 as you can check with coprime calculator). - Alice publicly shares her public key
(N,r)=(15,3). The public key isr=pk(a)=3butN=15is needed by Bob so Alice sharesNpublicly. - Bob chooses a random shared key
k=12for OTP and encrypts it with Alice’s public key by calculatingciphertext=plaintext^r mod N=12^3 mod 15=3(whereh=x mod ymeans thathis the remainder of the divisionx/yas1=3 mod 2) and you can verify the correctness of the calculation with Wlfram Alpha. So, Bob sends the ciphertext to Alice (bob->alice: 3). - Alice calculates
ssuch thatr*s + t*phi(N)=1. In our example we have3*s + t*8=1ands=3, t=-1could be one solution. However,s=3is going to be our private key and we’d have that the public keyr=3is equal to the private key. And, obviously, this is to be avoided. Another solution to the equation is:s=11, t=-4. Finally, Alice decrypts the ciphertext sent by Bob by calculatingciphertext^s mod N=3^3 mod 15=12which is the correct plaintext!
We could imagine that Alice then sends a signed ACKnowledge that she received the encrypted key from Bob (and that she managed to decrypt it).
- Alice encodes the ACK into the number 2,
ACK=2. She then encrypts it with her private keysignedtext=rsa-encrypt(ACK,pvt(a))=ACK^s mod N=2^11 mod 15=8. Alice then sends thesignedtextconcatenated with the plain ACK:alice->bob: signedtext.ACK=8.2. - Bob decrypts the signedtext as
rsa=decrypt(rsa-encrypt(ACK,pvt(a)),pk(a))=signedtext^pk(a) mod N=8^3 mod 15=2. Given that the result of the decryption is equal to the ACK shared as plaintext, Bob knows that Alice received the message as only Alice could sign (i.e. encrypt) with her private key.
How does RSA guarantee the confidentiality of the plaintext chosen by Bob?
The only messages that are exchanged are: N,r, and the ciphertext. The only
way for an attacker who performs (e.g.) a sniffing attack to decrypt the
ciphertext is to guess or calculate the prime number that are the factors of
N. However, there is no known algorithm for the efficient factorization of
N and this is known as the factoring problem.
NOTE: While Gregorio in his PDF correctly affirms that the public key is the
pair (N,r) I believe is clearer to affirm that only r=3 is the public key
because when we will use the private key to sign a message, we will only change (in the calculation)
r=3 and not N=15.
A GOOD QUESTION: What if an attacker performs a MITM attack and changes the public key that Alice is sharing to Bob with the public key of the attacker? This problem has no mathematical solution. The notion of trust is still at the beginning of any communication. However, afterwards we see the practical solution to this problem: Certification Authorities.
TLS: No Theory, Please!
TLS, Transport Layer Security, is a widely use security protocol. TLS is always used to make HTTPS connection secure (The S stands for SSL, which is the old name of TLS). TLS uses asymmetric encryption to exchange a symmetric key which is then used to encrypt the message exchange. An interesting exercise is to find those key and instruct wireshark to use them to decrypt the HTTPS traffic - left to the best students. The only thing left is to clarify the terminology used in TLS
- the public key is called certificate. Well, a certificate, e.g. X509, comes with some more information than the public key as we are going to see later on.
- the private key is called key.
There are a number of companies who owns servers that are trusted by operating systems, browsers, human being. Why? Mostly because… we need to trust someone. There are processes to perform, and standards to meet to become a certification authority but at the end of the day, we trust them because: yes. Let’s Encrypt is a certification authority, founded by Mozilla employees, highly skilled researcher, collaborate with the Linux Foundation and has a decade of history. Still, a flaw in their software made them release over 3 million faulty certificates. Should you trust their security? Should you believe that they didn’t make it on purpose to spy some traffic? That is on you to decide. I, personally, use Let’s Encrypt certificates.
So, once we trust a certification authority (CA), what do we do?
- We create a public key
pk(a) - We send it to a CA with our name/domain:
alice->CA: pk(a).alice - The CA checks that you actually own that domain (e.g. by asking you to add some record in your DNS or by installing some software on the server associated to your domain)
- The CA sends you you public key signed by the CA:
CA->alice: sign(pk(a),pvt(CA)) - Now you can send your public key, signed by the CA. Anyone who trusts the CA is going to trust you.
alice->bob: sign(pk(a),pvt(CA)).pk(a)
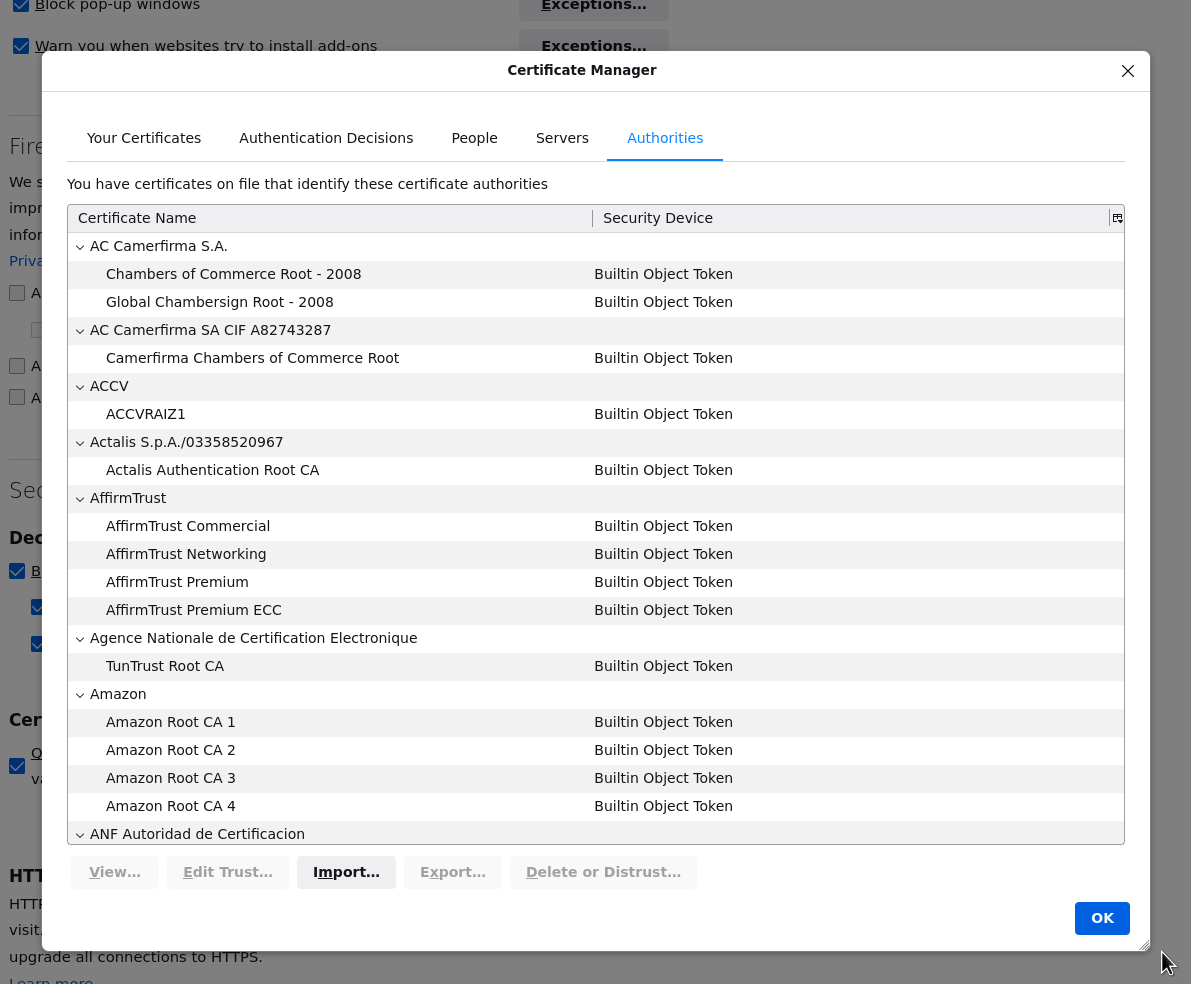
Do you want to see which CA your OS trusts? ls /etc/ssl/certs

You can also check your Firefox browser going to Settings -> Privacy & Security -> Certificates -> View Certificates:
Now, RSA is just one algorithm that can be used to implement a PKI (Public Key Infrastructure) but there are good reasons not to use RSA but Elliptic Curves instead. See, for example, this video by Trail of Bits on Youtube. The following script, uses elliptic curve cryptography to generate a CA certificate which is then use to sign the CSR (Certificate Signing Request) for the database. However, for this course, we assume that elliptic curve is just another method to do asymmetric encryption, exactly like RSA. The math is different but the type of encryption is the very same.
Create a new file vim dirs.sh and copy the following script:
#!/bin/bash
mkdir PKI
mkdir PKI/certs PKI/csr PKI/private PKI/db PKI/crl PKI/conf
touch PKI/db/index
touch PKI/db/serial
touch PKI/db/crlnumber
echo "01" > PKI/db/serial
pwd
Add exec permissions by chmod u+x ./dirs.sh and run it with ./dirs.sh
Find the openssl.cnf with find / -iname openssl.cnf 2>/dev/null. It should be in /etc/ssl/openssl.cnf.
Copy it to cp /etc/ssl/openssl.cnf ./PKI/conf and change the file PKI/conf/openssl.cnf as follows:
[ CA_default ]

dir             = ./PKI                 # Where everything is kept
certs           = $dir/certs            # Where the issued certs are kept
crl_dir         = $dir/crl              # Where the issued crl are kept
database        = $dir/db/index         # database index file.
serial          = $dir/db/serial        # The current serial number
crlnumber       = $dir/db/crlnumber     # the current crl number
certificate     = $dir/certs/cacert.crt # The CA certificate
private_key     = $dir/private/cakey.pem        # The private key
crl             = $dir/crl/cacrl.pem            # The current CRL
x509_extensions = usr_cert              # The extensions to add to the cert
#unique_subject = no                    # Set to 'no' to allow creation of
                                        # several certs with same subject.
new_certs_dir   = $dir/certs            # default place for new certs.
Create a new file vim pki.sh and copy the following script.
#!/bin/bash

echo "Root CA - key"
openssl ecparam -name prime256v1 -genkey -outform pem -out PKI/private/cakey.pem
echo "Root CA - cert"
openssl req -new -x509 -days 365 -config PKI/conf/openssl.cnf -addext "subjectAltName=DNS:ca.its.com" -addext "certificatePolicies=2.5.29.32.0" -extensions v3_ca -key PKI/private/cakey.pem -out PKI/certs/cacert.crt -outform pem -subj "/C=IT/ST=Italy/L=Verona/O=ITS/OU=Students/CN=ca.its.com/emailAddress=itsec@its.com"

# INTRANET TLS
echo "db.its.com - key"
openssl ecparam -name prime256v1 -genkey -outform pem -out PKI/private/dbkey.pem
echo "db.its.com - csr"
openssl req -new -key PKI/private/dbkey.pem -out PKI/csr/db.csr -config PKI/conf/openssl.cnf -addext "subjectAltName=DNS:db.its.com" -addext "certificatePolicies=2.5.29.32.0" -subj "/C=IT/ST=Italy/L=Verona/O=ITS/OU=Students/CN=db.its.com/emailAddress=itsec@its.com"
echo "db.its.com - cert"
openssl ca -in PKI/csr/db.csr -out PKI/certs/dbcert.pem -config PKI/conf/openssl.cnf -batch

cat PKI/db/index
chmod 400 PKI/private/dbkey.pem
Now you can run the pki.sh script (chmod u+x pki.sh and then ./pki.sh) to create a certification authority and sign the certificates of your db.
The output of the program shows the details of the certificate of the db.
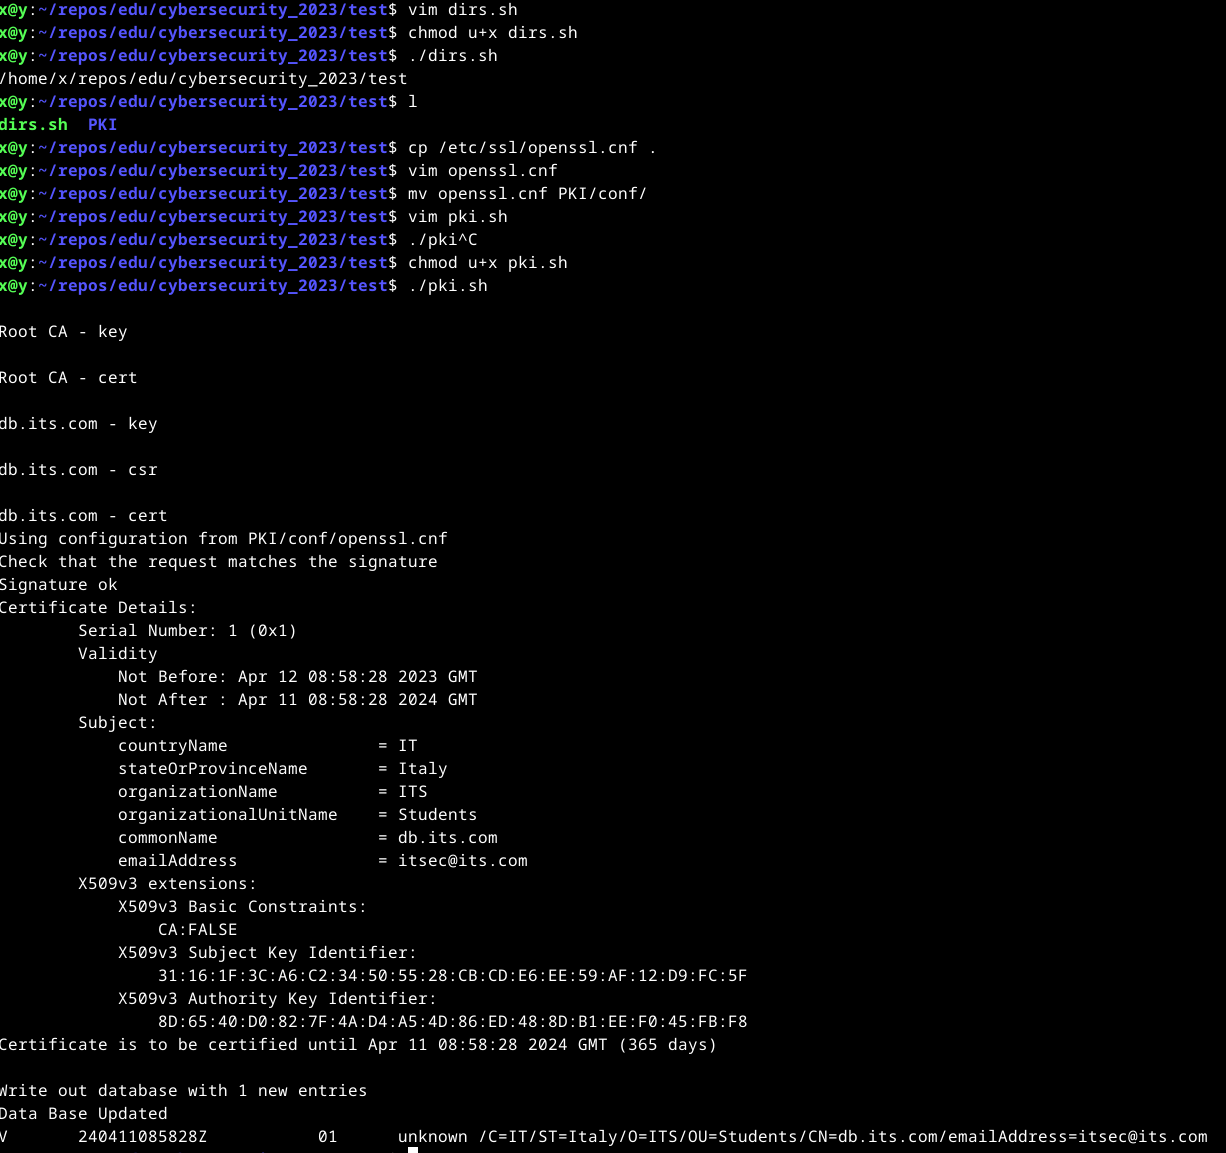
You can now explore what the keys and certificates are by looking at the files in the private and certs folder in the PKI folder.
As mentioned before, HTTPS uses TLS which, in turn, uses asymmetric encryption.
This means that, when you type https://edu.v-research.it/
it sends you a certificate, signed by a CA you trust. You can click on the lock icon
next to the url to get the certificate and obtain something like this:
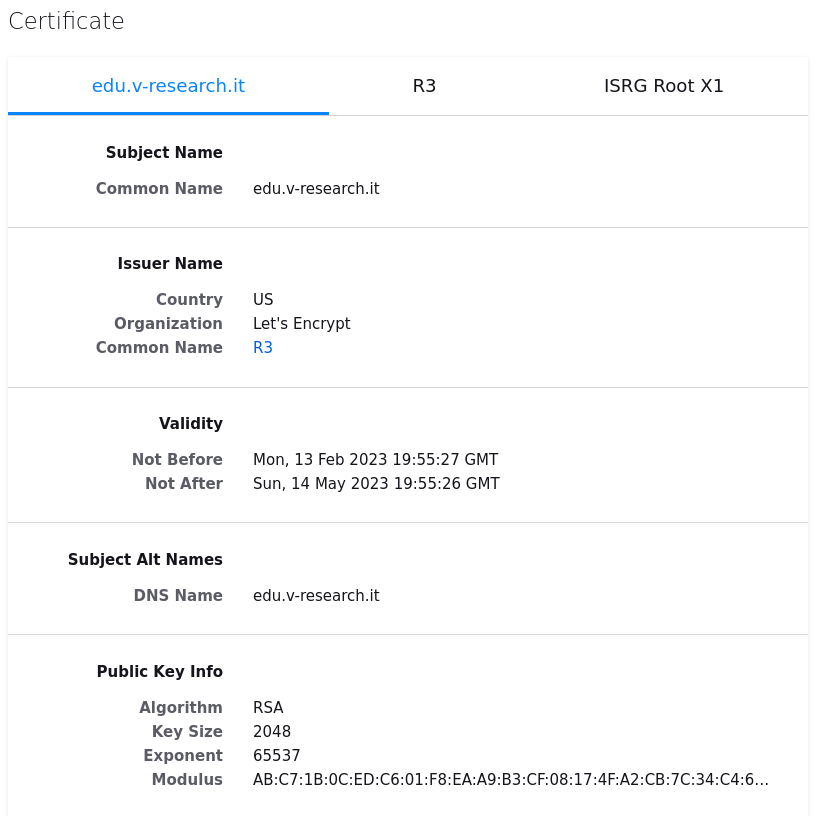
The section “Public Key Info” shows the exponent and modulus (r,N)=(pk(edu.v-research.it),N)
and the issuer name is the CA that released the certificate. As long as you (i.e., your browser)
trusts the CA and the certificate is valid, you can be sure the connection is secure: authenticated and confidential.
Certs in Postgres
Another way to generate the certificates is to follow the PostgreSQL manual which (at version 14) uses RSA:
What now? In the /etc/postgresql/12/main/postgresql.conf add ssl=on and change the following:
ssl_cert_file($PGDATA/server.crt) server certificate sent to client to indicate server’s identityssl_key_file($PGDATA/server.key) server private key proves server certificate was sent by the owner; does not indicate certificate owner is trustworthyssl_ca_filetrusted certificate authorities checks that client certificate is signed by a trusted certificate authorityssl_crl_filecertificates revoked by certificate authorities client certificate must not be on this list
If you capture the traffic with Wireshark, you will see that both confidentiality and integrity are preserved! As long as the authorization follows the least privilege principle, you have a secure database :)
Lesson 7 - Bittersweet Farewell
Ok, we are done. No more math, no more lessons, we can relax. As a goodbye I must hide a bit of melancholy. But what now? If I succeeded in sharing with you my passion for cybersecurity you don’t need to wait for the next course:
- You want to get deeper on what does it means to become an hacker? I suggest “hacking - the art of exploitation (2nd edition)” by Jon Erickson. You can find it online and you can always send me an email and I’ll be more than happy to lend you my copy of this beautiful book. Here you are going to know more on how computer works, their internals, C, Assembly, and how to write an Exploit. But you’ll also go into the details of network and security protocols.
- You wanna get into pentesting, learn the tools and how to use them? Then go fo TryHackMe.com. I suggest the Pentester course.
- You want to better understand Web attacks? Then WebGoat, JuiceShop, and XSSGame
I know, some of you may not have liked cyber that much. You may still wonder why the heck you got here. And for you: